In this exercise, you will update a loan application to decide whether to approve or reject a loan.
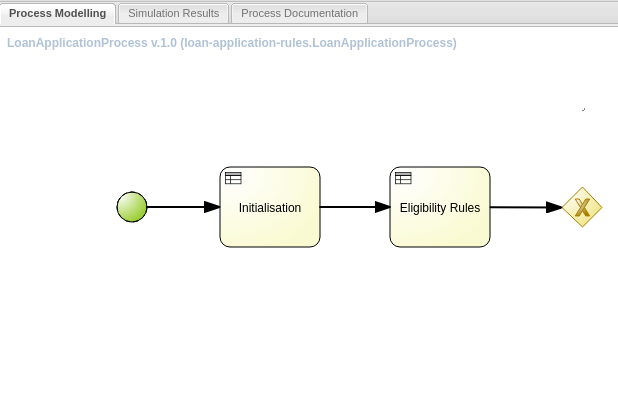
The rules are categorized in several groups, which themselves are organized in a process for ordered execution. The complete process looks like:
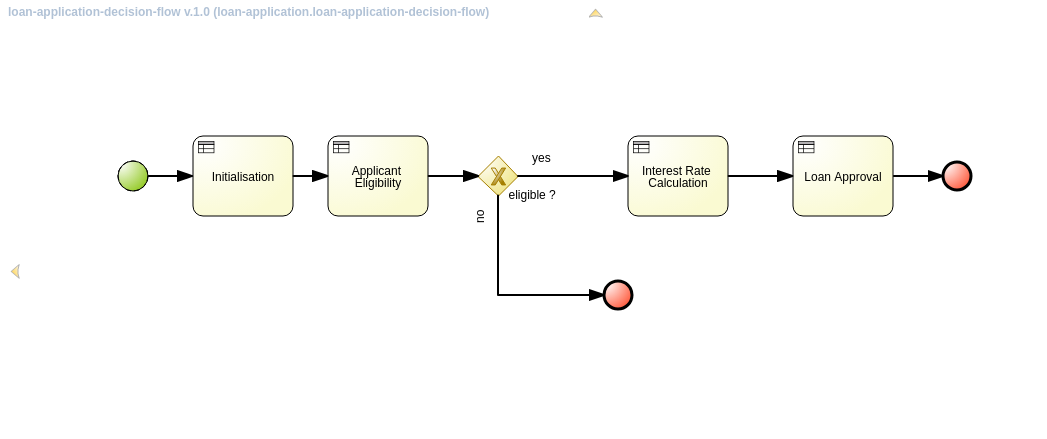 |
The rules are organized in groups called ruleflow-groups, and as the process is executed, the different rule groups are executed in isolation from each other. This has several advantages:
Organization of the rules in functional groups.
Better understanding of the use-case and overall functionality.
Rule authoring becomes easier because there are less side-effects caused by the inference engine.
For the use case lab the following ruleflow-groups are defined:
Initialization rules: initialize the domain object models
Eligibility rules: determine whether the application is eligible. As an example, if the applicant is too young or too old, then the application is rejected.
In the process definition, there is a decision point after the execution of the eligibility rules. If the application is not eligible, the process is terminated. In the opposite case the process continues with the interest rate calculation rules.
Interest calculation rules: determine the interest rate (based on requested loan amount and duration) and calculate the monthly repayment rate.
Loan approval rules: the loan is approved or rejected based on the debt ratio and the credit score of the applicant.
For each of these rule groups use another authoring technique. This is for educational purposes. It does not necessarily reflect the best or most convenient way to author business rules in Red Hat Decision Manager.
Outcomes
You should be able to implement rules using guided rules, decision tables, and organize the execution with ruleflows.
You must be logged in to the Decision Central web page as adminUser, using the test1234! password.
Set up the project for the loan application app.
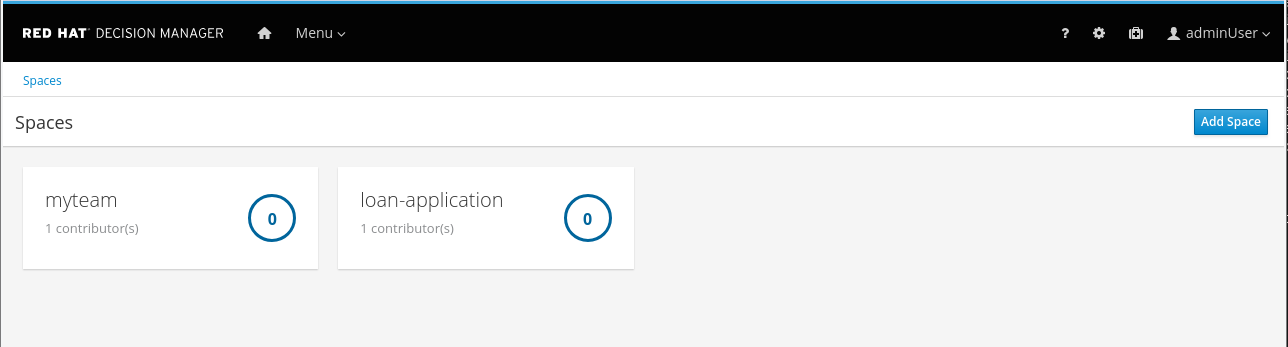
Log in to Decision Central, and navigate to the Spaces view. From the home screen in Decision Central, click projects (just below the Design icon), and then on Spaces in the upper left corner. Click Add Space in the upper right corner. Name your new space loan-application.
Select the loan-application space, and click Add Project to create a new project in the space. Name the project
loan-application-rules.Create the
Applicantdata object model.The
Applicantdata object represents the person applying for a loan. Holds information about age and income.In the loan-application-rules project view, click Data Object. Alternatively, click Create New Asset and choose Data Object from the drop-down menu.

In the Create new Data Object dialog box, enter
Applicantas the data object name. Choosecom.loan_application.loan_application_rulesas package. Leave Persistable unchecked.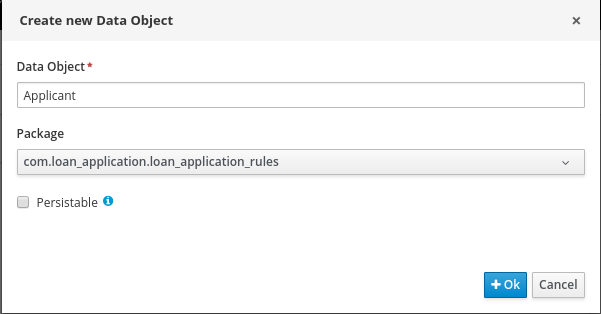
Click Ok to create the data object.
In the Applicant data object view, click add field to add fields to the data object.
In the New Field dialog, enter name as id,
Nameas label, andStringas type. Leave Listunchecked.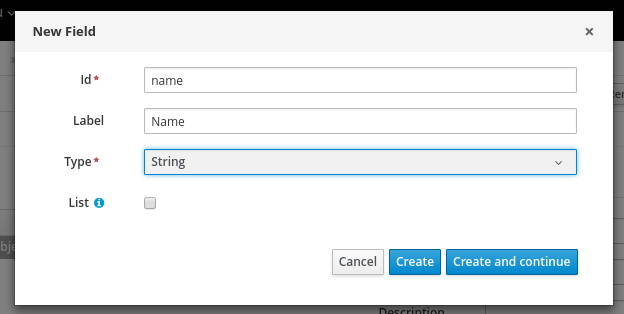
Click Create and continue to create the field.
Create the following fields for the
Applicantdata object:Field Label Type name Name String age Age int creditScore Credit Score int eligible Eligible Boolean monthlyIncome Monthly Income double yearlyIncome Yearly Income long NOTE
Note that the field names use camel case.
The type of the
eligiblefield should beBoolean(with capitalB).Once finished, the
Applicantdata object looks like: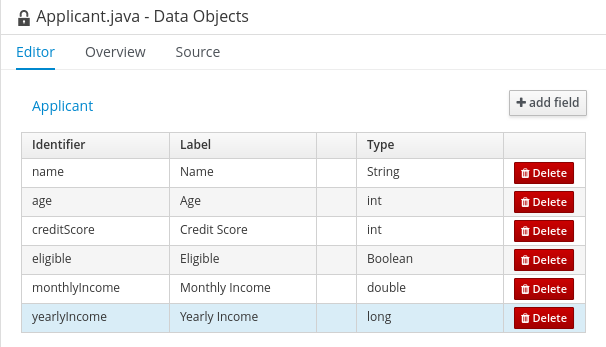
Click Save to save the data object.
Create a second data object named
Loan. The data object stores the characteristics of the requested loan such as amount and duration. The result of the approval process is stored in this object.In the
com.loan_application.loan_application_rulespackage, with the following fields:Field Label Type amount Amount long approved Approved boolean comment Comment String duration Duration int interestRate Interest Rate double monthlyRepayment Monthly Repayment double 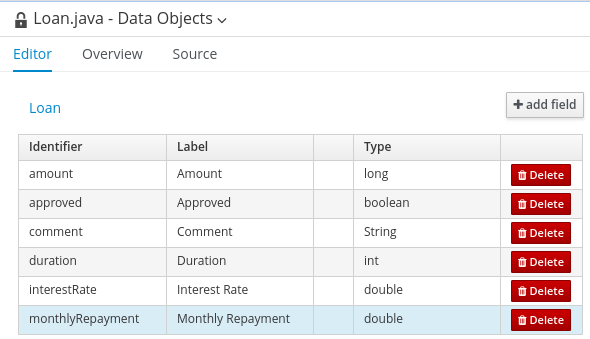
Compose the initialization rules with Drools Rule Language (DRL).
DRL is the syntax that the Decision Manager rules execution engine expects. Rules authored with different techniques are ultimately transformed in DRL rules. DRL consists of two rules
A rule has a name, and the following skeleton:
rule "name"
<rule-attributes>
when
  <conditional elements>
then
  <actions>
end
The when part (or Left-Hand Side) of the rule consists of one or more conditional patterns. If all patterns evaluate to
true, the rule will fire, and the action part is executed.The conditional element defines variables whenever an object of that type is in the current session. An object inserted into the working memory is also called a fact.
The actions part are Java code fragments. They are executed when the rule fires.
The initialization rules set some default values on the
ApplicantandLoandata objects.In the
loan-application-rulesproject view, click Create New Asset and choose DRL file from the drop-down menu.In the Create new DRL file dialog box, enter
Initialisationas name of the DRL file. Select thecom.loan_application.loan_application_rulespackage, and leave the Use Domain Specific Language unchecked.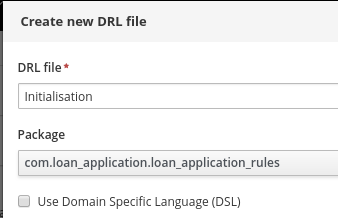
NOTE
The following source code can be downloaded from
http://materials.example.com/labs/Initialisation.drlIn the DRL editor, paste the following under the package declaration:
import com.loan_application.loan_application_rules.Applicant;
import com.loan_application.loan_application_rules.Loan;

rule "Setting default values on Applicant"
	dialect "mvel"
	ruleflow-group "initialisation-rules"
	no-loop true
	when
	    applicant : Applicant( )
	then
	    System.out.println("Rule fired : [" + drools.getRule().getName()+"]");
	    applicant.setEligible( true );
	    applicant.setMonthlyIncome (applicant.getYearlyIncome()/12);
end

rule "Setting default values on Loan"
	dialect "mvel"
	ruleflow-group "initialisation-rules"
	no-loop true
	when
	    loan : Loan( )
	then
	    System.out.println("Rule fired : [" + drools.getRule().getName()+"]");
	    loan.setApproved( false );

end
In the conditional element
when, the patternApplicant( )means: there is an object of typeApplicantin the working memory. There are no further constraints defined on theApplicantobject. So this rule will be activated for every object of typeApplicantpresent in the working memory.In the
Setting default values on Applicantrule, theeligiblefield is set totrue, and the monthly income field is set to the value of the yearly income field divided by 12.As part of the rule actions the name of the rule is written to the console.
The
ruleflow-groupattribute determines to whichruleflow-groupthe rule belongs. Ruleflow is a feature that controls over the firing of rules. Rules that are assembled by the sameruleflow-groupidentifier fire only when their group is active.When using ruleflow processes,
ruleflow-groupsare used to restrict the rules that can fire in the context of a node in the process.The
no-loopattribute prevents a rule from being activated again after changing the state of a fact. In the case of theSetting default values on Applicantrule, the conditional pattern stays true after the firing of the rule, sono-loopprevents that the rule is activated again which would result in an endless loop.
Validate the rules for syntax errors by clicking Validate.
Click Save.
Create a test scenario.
The Decision Central tool allows to define test scenario’s in order to verify the correctness of the rules. Rules can be tested in isolation, or as a group.
In general, it is considered good practice to maintain test scenario's for the rules in a rule set. In the case of large rule sets, this can become cumbersome to do so in Decision Central. An alternative is to write tests as Java unit tests, outside of the Decision Central tool. This however is out of reach for most business analysts.
Create the test scenario.
In the
loan-application-rulesproject view, click Create New Asset and choose Test Scenario from the drop-down menu.In the Create new Test Scenario dialog box, enter
InitialisationTestsas name of the test scenario, and select thecom.loan_application.loan_application_rulespackage.Define the structures used by the rules.
Typically, test scenario’s consist of a
givenpart, and anexpectationpart. In the given part, you describe the state of the working memory before firing the rules. The expectation part describes the expected outcome of the rule execution.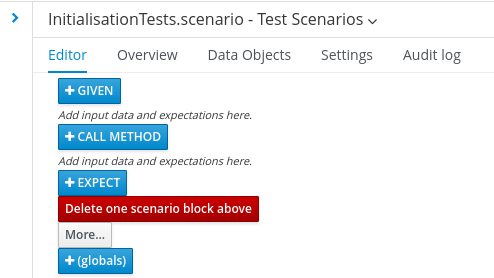
Click Given. In the New input dialog box, insert a new fact of type
Applicant, and bind it to the nameapplicant. Click Add next to the fact name.
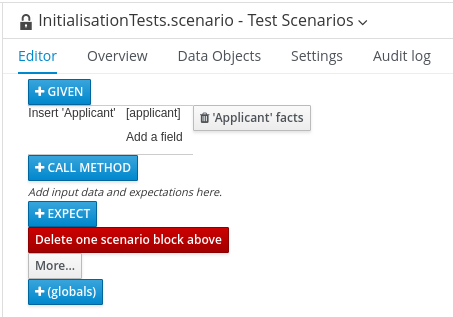
Click Add a field under Insert Applicant [applicant]. In the dialog box, select the yearlyIncome field. Click Ok.
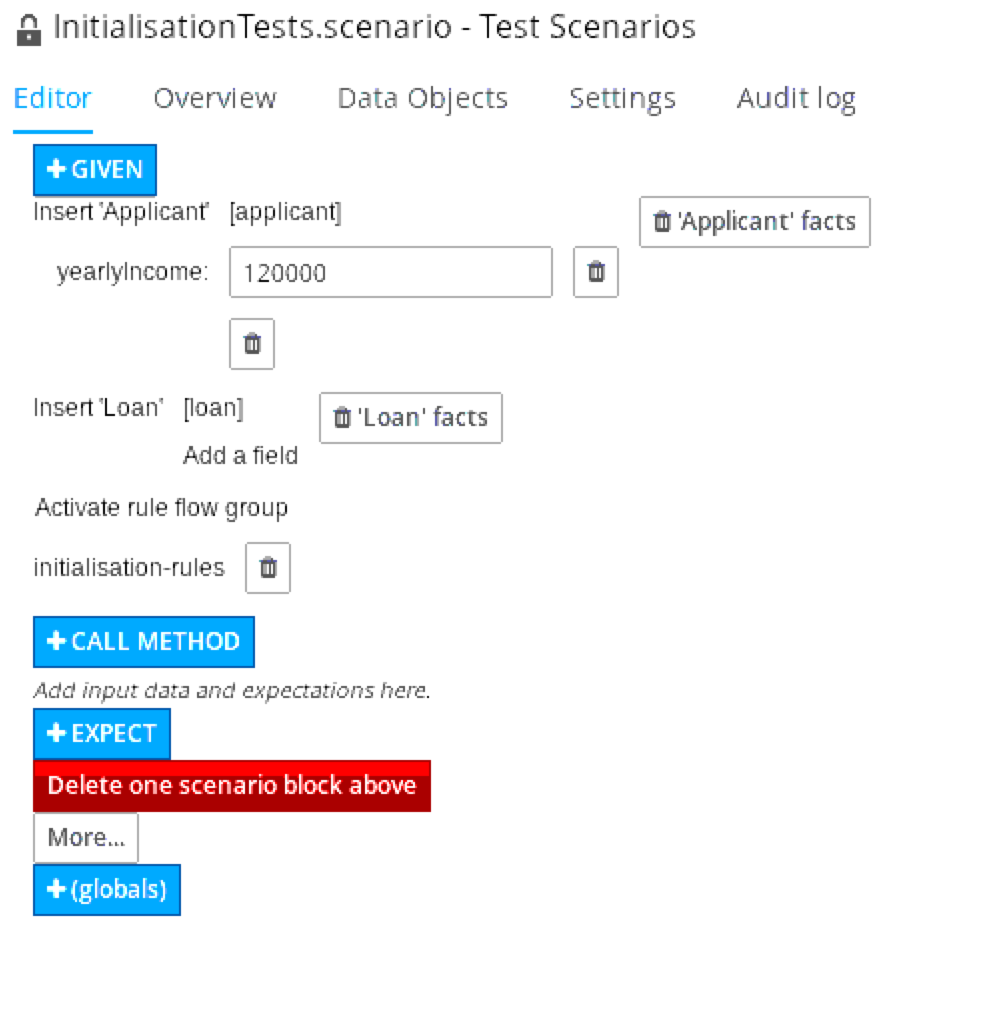
Click on the pencil icon next to
yearlyIncome. In the dialog box, select Literal value. Back on the test scenario screen, type a value of 120000 in the text box next to yearlyIncome.Click Given to add a fact of type
Loanwith fact nameloan.Click Given, and in the dialog box enter
initialisation-rulesin the Activate rule flow group field. Click AddAt this moment, your test scenario should look like:
Click Expect. In the New expectation dialog box, select
applicantin the Fact value drop-down. Click Add.Back in the test scenario screen, click Applicant 'applicant' has values link. In the Choose a field to add dialog box, select the
monthlyIncomefield. Click Ok.Back in the test scenario screen, in the dropdown box next to
monthlyIncome, select equals, and in the text box next to it enter10000.0.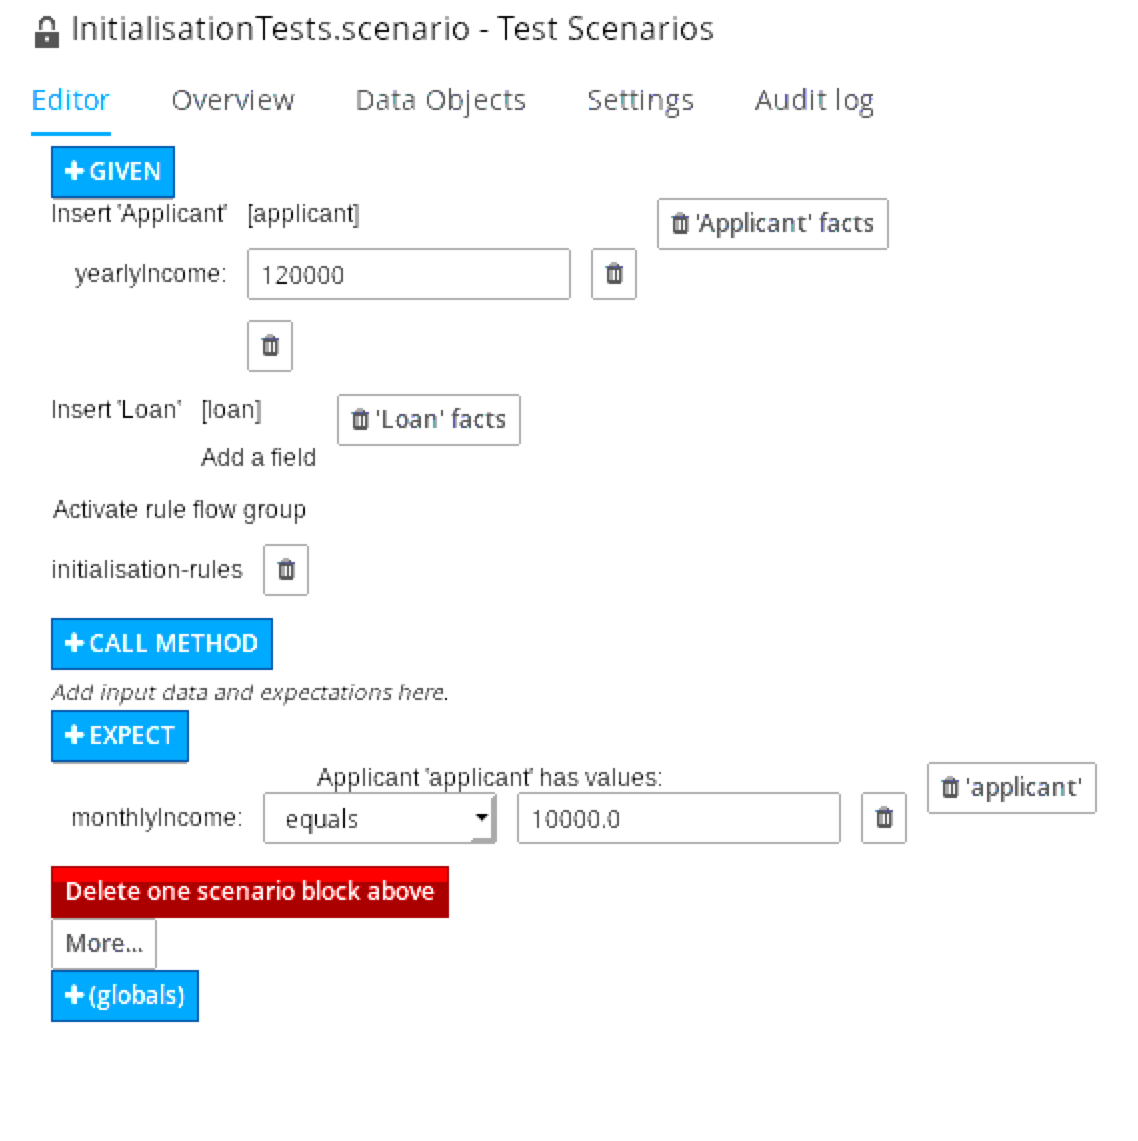
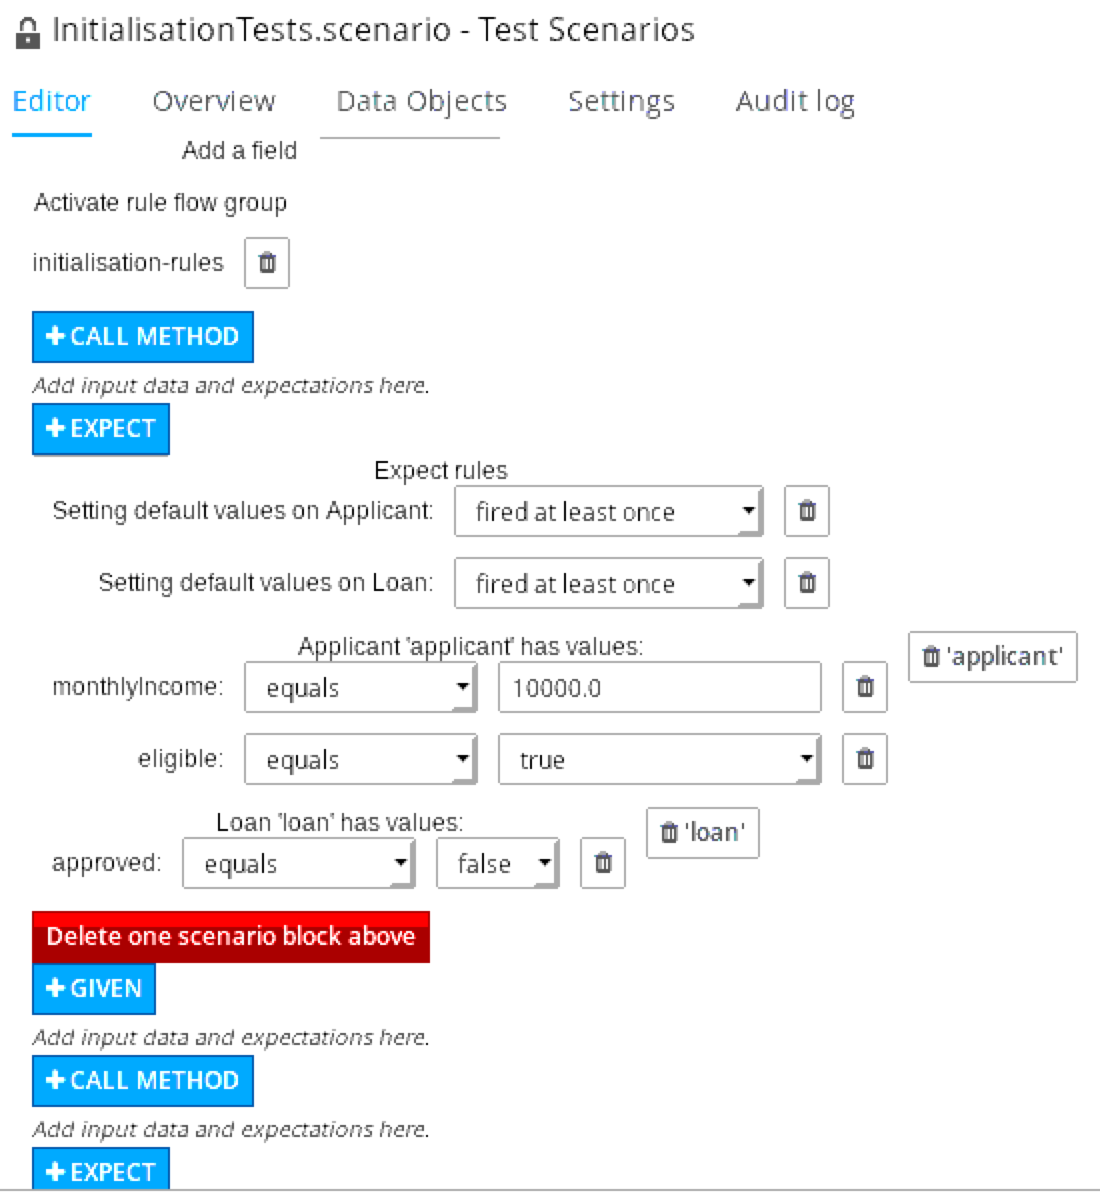
Click Applicant 'applicant' has values to add another value, and this time select the
eligiblefield.Set the expectation for the
eligiblefield to equals andtrue.Click Expect. In the New expectation dialog box, select
loanin the Fact value drop-down. Click Add.Add an expectation for the
approvedfield ofloan, and set to equals andfalse.Click Expect, and in the dialog box, select the Setting default values on Applicant rule. Click Ok. Back in the test scenario screen, select fired at least once for the Setting default values on Applicant. Repeat for the Setting default values on Loan.
At this moment, your test scenario should look like:
Save the test scenario.
To run the scenario, click Run scenario on the top right. In the Reporting section of the section, you should see a green bar with Success. This indicates that the test scenario executed successfully.

A red bar means that the test failed. In that case, you need to fix the rules under
test, or the test case itself. Verify the test setup (the given part) and the expectations, and correct if needed. The goal is to end with a green bar.
Author rules with the Guided Rules Editor and a DSL.
The Guided Rules Editor is a graphical editor in Decision Central that offers a graphical and guided approach to writing DRL rules. As such it is easier to use for less experienced or less technical users than the free flow DRL editor.
In Decision Manager, a domain-specific language (DSL) acts as a kind of stylesheet for DRL rules, allowing rule fragments (conditions and actions) to be expressed in a more natural language.
In this section of the lab, you will develop the eligibility rules, which determines whether an applicant is eligible for a loan. In this first iteration the rules are quite simple: applicants younger than 18 or older than 70 are not eligible, all the others are.
Create the DSL, and use it afterwards to author the rules.
In the
loan-application-rulesproject view, click Create New Asset and choose DSL definition from the drop-down menu. In the Create new DSL definition dialog box, enterEligibilityDSLas name of the DSL definition file. Select thecom.loan_application.loan_application_rulespackage. Click .NOTE
The following source code may be found at
http://materials.example.com/labs/EligibilityDSLThe DSL editor is a simple text editor. In the editor, paste the following contents:
[when]The applicant is less than {age} years old=applicant:Applicant( age < {age} )
[when]The applicant is more than {age} years old=applicant:Applicant( age > {age} )
[when]There is a loan=loan:Loan()
[then]The applicant is not eligible=modify( applicant ) \{ setEligible( false )\}
[then]The loan is rejected because "{message}"=modify( loan ) \{setApproved(false), setComment( "{message}" )\}
[then]Log rule name=System.out.println("Rule fired : [" + drools.getRule().getName()+"]");
The DSL functionality acts as a substitution engine, where natural language fragments are replaced by DRL fragments when building the rule.
DSL can be used in both conditions and actions. The DSL fragment starts with
[when]or[then]to distinguish between both.The language fragments are parametrizable, and can be reused in several rules. Parameters are enclosed in curly braces.
In a DSL fragment, the part before the
=sign is the natural language fragment shown in the editors. The part following the=sign is the corresponding DRL fragment.Save the DSL fragment.
Create the guided rule.
In the
loan-application-rulesproject view, click Create New Asset and choose Guided rule from the drop-down menu.In the Create new Guided Rule dialog box, enter
EligibilityApplicantTooYoungas name of the DRL file. Select thecom.loan_application.loan_application_rulespackage, and check the Use Domain Specific Language check box.In the Guided Rule Editor, click on the green + icon on the far right of the
WHENword. The Add a condition to the rule… dialog window opens: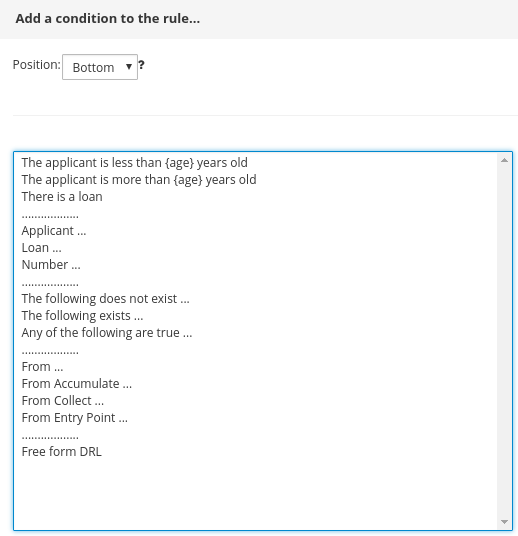
In the dialog box, select the phrase
The applicant is less than {age} years old. Click .In the guided rule editor, enter
18in the age field.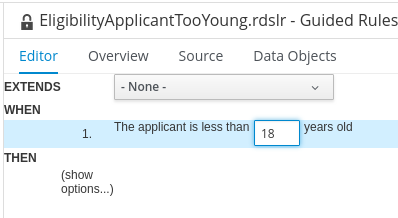
Click again on the green + icon to add another condition. This time select the
There is a loansentence.Click on the green + icon on the far right of the
THENclause to add an action to the rule. Select theThe applicant is not eligiblesentence.Add another action, and this time select
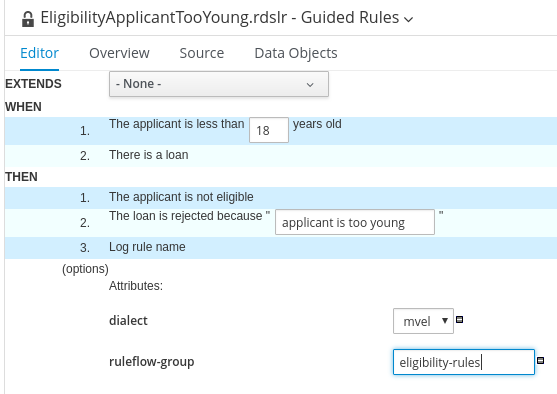
The loan is rejected because {message}sentence. In the editor, enterapplicant is too youngas value for message.Add another action, and select the
Log rule namesentence.Finally, in the editor click (show options…). Click on the green + on the opposite side, and in the Add an option dialog box, choose the
ruleflow-groupattribute.In the editor, enter
eligibility-rulesas name of theruleflow-group.At this point, your guided rule editor should look like:
Save the rule.
Click on the Source tab of the editor to see what the final rule looks like in plain DRL. Expect to see:
package com.loan_application.loan_application_rules;

import java.lang.Number;

rule "EligibilityApplicantTooYoung"
	dialect "mvel"
	ruleflow-group "eligibility-rules"
	when
		applicant:Applicant( age < 18 )
		loan:Loan()
	then
		modify( applicant ) { setEligible( false )}
		modify( loan ) {setApproved(false), setComment( "applicant is too young" )}
		System.out.println("Rule fired : [" + drools.getRule().getName()+"]");
end
Repeat the steps to create another guided rule with DSL. In contrast to the free DRL editor, which can contain several rule definitions in one file, the Guided rule is limited to one rule per file.
Name the rule
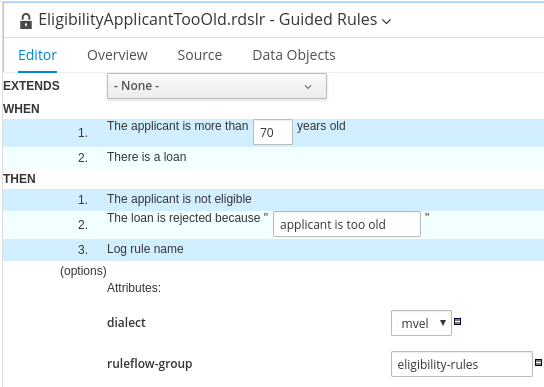
EligibilityApplicantTooOld.Select the
Applicant is more than {age} years oldas first condition. The value of age should be70.The rejection message is
applicant is too old.When finished, your rule should look like:
Create test scenarios for the eligibility rules.
As an example, a test scenario for the
EligibilityRuleTooYoungrule could look like: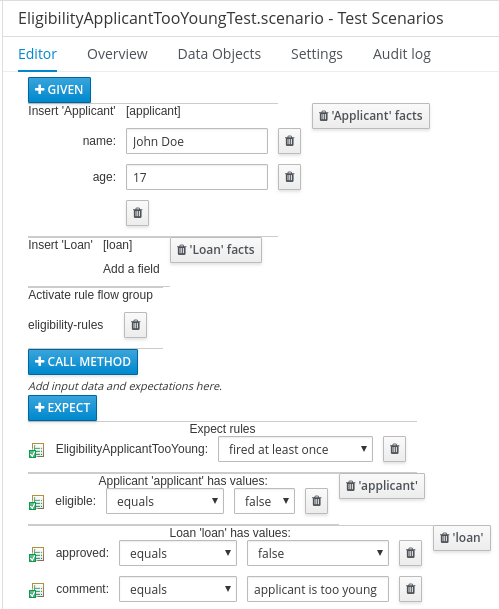
Use as part of the Given section:
Applicant's information: age = 17 and name = 'John Doe'
Create an empty Loan
Activate rule flow group: eligibility-rules
Use as part of the Expect section:
EligibilityApplicantTooYoung fired at least once
Loan's information: approved = true and comment = 'applicant is too young'
Author rules in a spreadsheet editor.
Decision tables are a popular method for authoring rules, especially among nontechnical people. Decision tables are particularly well suited for rules that can be expressed as rule templates and data, with other words when you have a potentially large set of identical rules, that only differ in the parameters they use.
Decision Central supports the authoring of rules in Microsoft Excel or LibreOffice Calc. Authoring rules in a spreadsheet has the additional advantage that it is fairly easy to have control over what parameters of rules can be edited, without exposing the rules directly.
Note that while supporting rules authored in a spreadsheet, Decision Central has no editor for spreadsheets. The rules need to be maintained outside of Decision Central, and uploaded as a binary file. At runtime, the spreadsheet will be converted into DRL rules.
A rules spreadsheet has a tabular format, where columns represent a condition or an action. Every row in the table represents one rule. The spreadsheet can contain multiple tables representing different sets of rules.
In this section of the lab, you will author the rules that determine the interest rate of the requested loan, which is a function of the loan duration and borrowed amount.
NOTE
To skip the creation of the spreadsheet, you may:
Download the spreadsheet from
http://materials.example.com/labs/interest-rate-calculation.xls, and upload it to Decision Manager.Implement the rules using a Guided Decision Table in Decision Manager. Instructions for doing so are provided at the end of this document.
The calculation of the interest rate depends on the range of the loan amount and the loan duration. So in the decision table, you will need condition columns for the minimum value of the loan amount range, the maximum value of the range, and the loan duration.
Create the spreadsheet.
Open the spreadsheet program of your choice (Excel or LibreOffice) and create a new spreadsheet.
Create the metadata for the interest rate calculation rules.
In cell B2, enter the value
RuleSet.In cell C2, enter the value
com.loan_application.loan_application_rules.For historical reasons, the terminology used in rule spreadsheets is somewhat different than in plain DRL rules. A
RuleSetis the equivalent of a package in DRL rules. A package is a means of organizing rules, it has no influence on the rule execution. Typically, rules that belong together from a functional point of view are kept in the same package.In cell B3, enter the value
import.In cell C3, enter
com.loan_application.loan_application_rules.Loan.The interest rate rules only use the Loan data object, so there is no need to import the
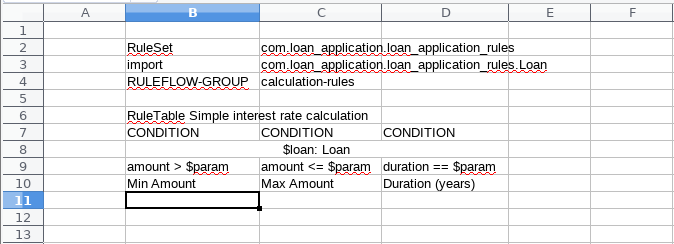
Applicantobject.At this point, the spreadsheet looks like:

In cell B6, enter
RuleTable Simple interest rate calculation. ARuleTablecorresponds to one rule set. The name of theRuleTablewill be used for the name of the generated DRL rules.Create a condition column for the minimum value of the loan amount range.
In cell B7, enter
CONDITIONto characterize the column as a condition column.In cell B8, enter the fact on which the condition applies:
$loan:Loan. The condition applies on an object of typeLoan, bound to the variable name$loan. Note that the$sign is merely a convention, to easily distinguish between fact bindings and fact properties.In cell B9, enter the condition for this column:
amount > $param.amountis a field of theLoanobject and$paramrefers to a rule parameter, and ir corresponds to the value that will be entered in the rows of theRuleTable.In cell B10, add the title for this column:
Min amount. The title is only for the purpose of documentation.
Create a condition column for the maximum value of the loan amount range.
In cell C7, enter
CONDITION.Leave cell C8 blank for the moment.
In cell C9, enter the condition for this column:
amount <= $param.In cell C10, add the title for this column:
Max amount.Create a condition column for the loan duration.
In cell D7, enter
CONDITION.Leave cell D8 blank for the moment.
In cell D9, enter the condition for this column:
duration == $param.In cell D10, add the title for this column:
Duration (years).Because the three conditions entered so far act on the same fact, the fact cells can be joined together. Merge the cells B8-C8-D8.
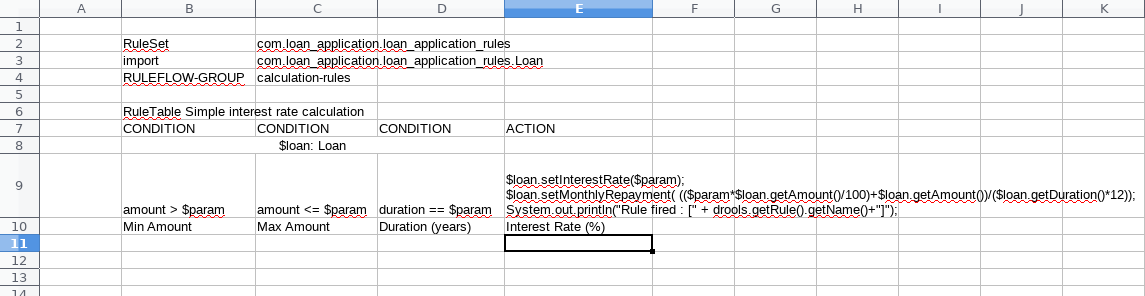
Create an action column to set the interest rate of the loan, and calculate the monthly repayment.
In cell E7, enter
ACTIONto characterize it as an ACTION column.Leave cell E8 blank.
In cell E9, enter the action statements for this column:
$loan.setInterestRate($param);
$loan.setMonthlyRepayment( (($param*$loan.getAmount()/100)+$loan.getAmount())/($loan.getDuration()*12));
System.out.println("Rule fired : [" + drools.getRule().getName()+"]");
This sets the InterestRate field of the loan fact to the value of the rule parameter—the value in the rows.
This also calculates the monthly repayment (a function of the amount, the duration and the interest rate).
Finally, log the name of the rule that fired to the console.
In cell E10, add the title for this column:
Interest rate (%).At this point, the spreadsheet looks like:
Create a condition column for the maximum value of the loan amount range.
Enter the first row of the table. Every row represents one rule.
In cell A11, enter a name for the rule:
Small - 7 years.Leave cell B11 blank
A blank cell means that this value does not have to be taken into account.
In cell C11, enter
300000.In cell D11, enter
7.In cell E11, enter
0.47.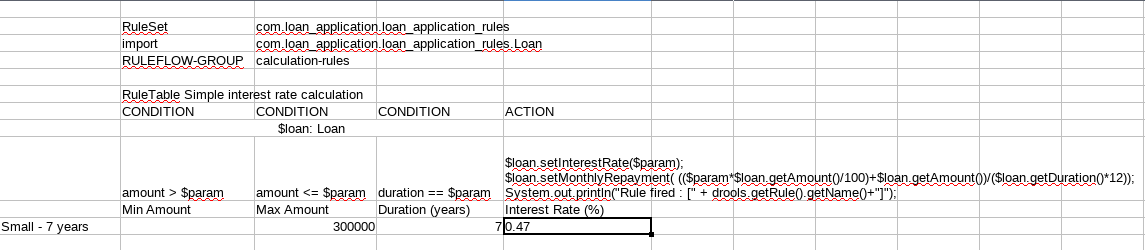
This rule states that for a loan with an amount smaller or equal to 300.000, and with a duration of seven years, the interest rate is 0.47%
Enter the rows of the table. Every row represents one rule.
In cell A12, enter a name for the rule:
Large - 7 years.In cell B12, enter
300000.In cell C12, enter
600000.In cell D11, enter
7.In cell E11, enter
0.70.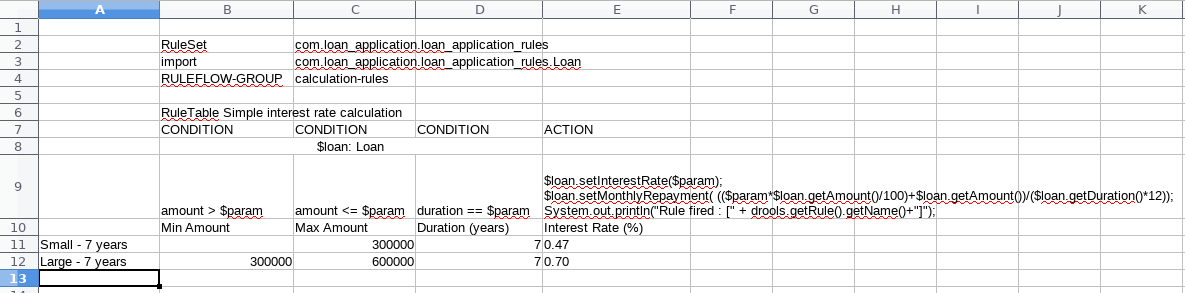
This rule states that for a loan with an amount between 300.000 and 600.000, and with a duration of 7 years, the interest rate is 0.70%.
Fill in the remainder of the rows according to this table:
Name Min Amount Max Amount Duration Interest Rate Small - 7 years 300000 7 0.47 Large - 7 years 300000 600000 7 0.70 Very Large - 7 years 600000 7 0.98 Small - 10 years 300000 10 0.72 Large - 10 years 300000 600000 10 0.90 Very Large - 10 years 600000 10 1.10 Small - 12 years 300000 12 0.87 Large - 12 years 300000 600000 12 1.06 Very Large - 12 years 600000 12 1.31 Small - 15 years 300000 15 1.06 Large - 15 years 300000 600000 15 1.20 Very Large - 15 years 600000 15 1.45 Small - 20 years 300000 20 1.25 Large - 20 years 300000 600000 20 1.39 Very Large - 20 years 600000 20 1.65 Small - 25 years 300000 25 1.45 Large - 25 years 300000 600000 25 1.65 Very Large - 25 years 600000 25 1.85 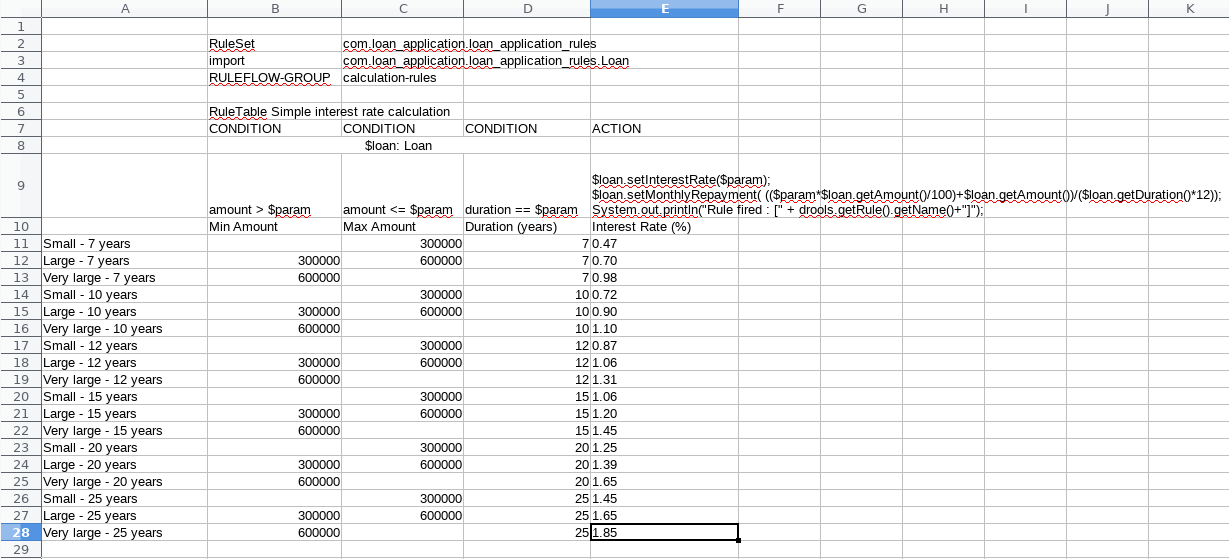
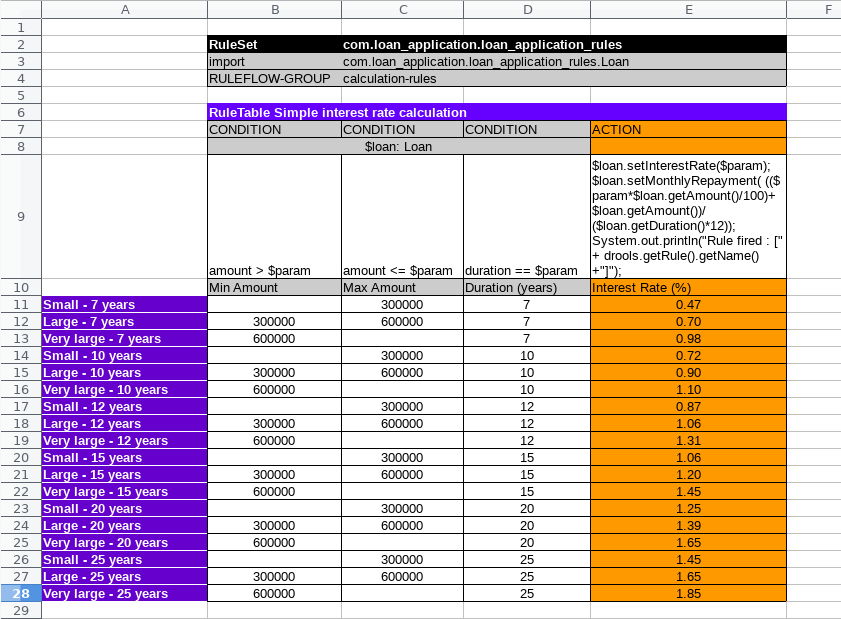
The resulting spreadsheet is syntactically correct, but not very readable. With the use of colors and indentation the spreadsheet is readable.
Save the spreadsheet with the name
interest-rate-calculation.xlsUsing the
xlsextension forces LibreOffice to use Excelxlsformat.Upload the spreadsheet to Decision Central.
In the loan-application-rules project view, click and choose
Decision Table (Spreadsheet)from the drop-down menu.In the
Create new Decision Table (Spreadsheet)dialog box, name the decision table IntrestRateCalculation. Select thecom.loan_application.loan_application_rulespackage and the appropriate format (xlsorxlsx). Finally select the file to upload from your file system. Click Ok.In the
Sourcetab of the Decision Table view, you can see the DRL rules that are generated from the spreadsheet.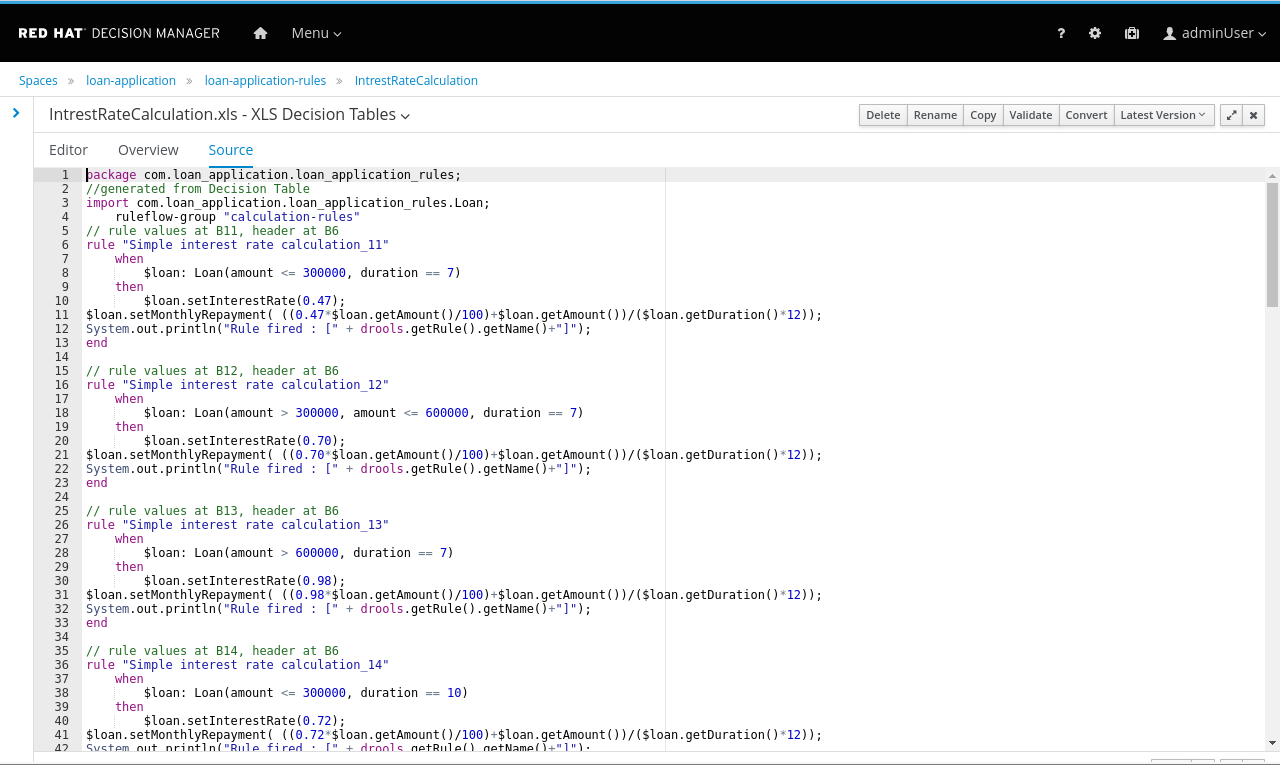
Note that for every row in the spreadsheet table, a rule is generated.
The name of the rule is built from the name of the RuleTable and the row number in the spreadsheet.
Author rules with the guided decision table.
With Decision Central you can author business rules in a decision table inside the tool, rather than externally in a spreadsheet.
The principle remains the same: columns represent conditions or actions, and every row is transformed to a single rule. Just as with spreadsheet decision tables, the decision table will be transformed to a rule set of DRL rules at runtime.
Author the rules that determine if a loan application should be approved or rejected. This decision is a function of the applicant’s debt ratio, the credit score range, and the loan amount range. As a result the approved field of the
Loanobject is set totrueorfalse.Create a guided decision table.
In the
loan-application-rulesproject view, click Create New Asset and choose Guided Decision Table from the drop-down menu.In the Create new Guided Decision Table dialog box, enter
LoanApprovalas the Guided Decision Table name. Select thecom.loan_application.loan_application_rulespackage. Deselect Wizard. Leave the Hit Policy to None. For Table Format, choose Extended entry, values defined in table body. Click Ok.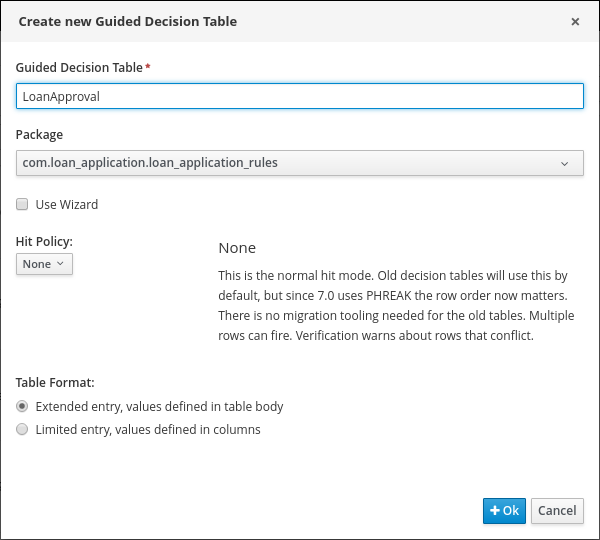
Define the minimum value of the loan amount range column.
In the Guided Decision Table view, click on → to insert a new column.

In the Add a new column dialog box, select Add a condition. Click Next.
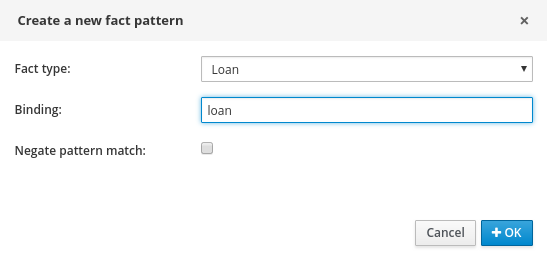
In the next dialog, click . Select Loan as fact type and loan as binding. Leave the Negate check box unchecked. Click Ok.
Back in the main dialog box, click Next.
Select Literal Value for the calculation type. Click Next.
Select the amount field. You do not need a binding for the amount field, so click Next.
Choose greater than as operator. Click Next.
You do not need a value list or default values for this column, so click Next.
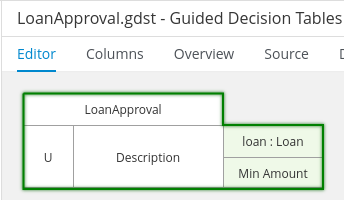
Set the Header (description) to
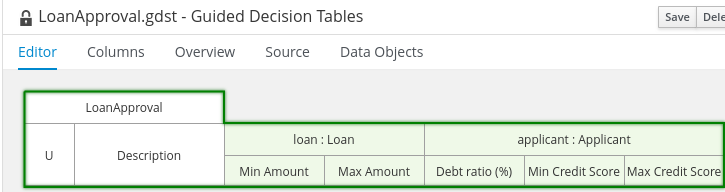
Min Amount. Leave the Hide column unchecked. Click Finish.At this point the decision table looks like:
Add a column for the maximum value of the loan amount range.
Select the existing Loan[loan]fact pattern, and use less than or equal to as operator for the amount field. Set the header to
Max Amount.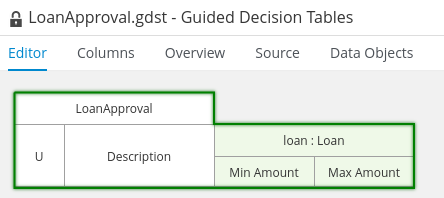
Add a condition column for the debt ratio of the applicant.
The debt ratio is obtained by dividing the monthly repayment for the loan by the monthly income of the applicant.
In the Guided Decision Table view, click on → to insert a new column.
In the Add a new column dialog box, select Add a condition. Click Next.
In the next dialog, click Create a new Fact Pattern. Select Applicant as Fact type and
applicantas binding. Leave the Negate check box unchecked. Click Ok.Choose Predicate as calculation type. Click Next.
In the Field field, add the following predicate:
100*(loan.getMonthlyRepayment()/this.getMonthlyIncome()) $param
A predicate is an expression that is evaluated to true or false.
When the rule is evaluated,
$paramis replaced by the value in the rule row for this column. If the rule contains the value< 30, the evaluated predicate becomes100*(loan.getMonthlyRepayment()/this.getMonthlyIncome()) < 30. If the predicate evaluates to true, the rule might fire—if all other conditions match as well.thisrepresents the current fact, in this case the Applicant.
Leave
Value listandDefault valueblank.Set the column header to
Debt ratio (%).Add a condition column for the minimum value of the credit score range
Fact pattern: Applicant [applicant].
Calculation type: Literal value.
Field: creditScore, no binding required.
Operator: greater than.
Column header:
Min Credit Score.
Add a condition column for the maximum value of the credit score range
Fact pattern: Applicant [applicant].
Calculation type: Literal value.
Field: creditScore, no binding required.
Operator: less than or equal to.
Column header:
Max Credit Score.At this point the decision table looks like:
Add an action column to set the
approvedfield on theLoanobject:In the Guided Decision Table view, click on → to insert a new column.
In the Add a new column dialog box, select Set the value of a field. Click Next.
In the next dialog, select the Loan [loan] pattern. Click Next.
Select the approved field. Click Next.
You do not need a value list or default values for this column, so click Next.
Set the Header description to Approved. Leave Hide column unchecked. Leave Update engine with changes unchecked. Click Finish.
Add an action column to set the comment field of the
Loanobject.Use the Set the value of a field column type.
Use the Loan [loan] fact pattern.
Use the comment field.
In the Value list field, add the value enumeration for the comment field:
"insufficient credit score","sufficient credit score","debt ratio too high","amount too low","amount too high"
Set the Header description to Comment. Leave the Hide column unchecked. Leave Update engine with changes unchecked.
Add an action column to log the name of the rule to the console when it is fired.
In the Guided Decision Table view, click on → to insert a new column.
In the Add a new column dialog box, mark the Include advanced Options checkbox. Select Add an Action BRL fragment. Click Next.
In the next dialog window, click on the green + icon next to THEN. In the Add a new action dialog box, select Add free form DRL.
Back in the Add a new column dialog box, enter the following in the free from DRL text box:
System.out.println("Rule fired : [" + drools.getRule().getName()+"]");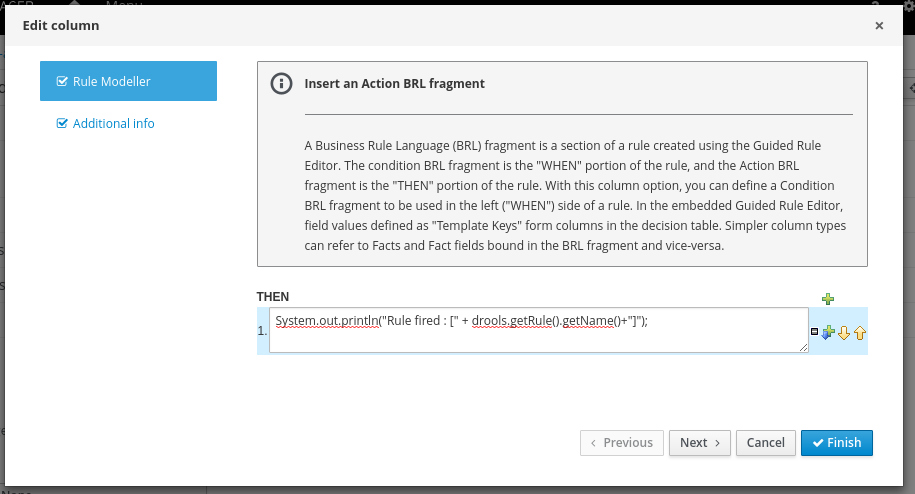
Set
Log rule nameas header description, and check the Hide column checkbox. Click Finish.
Specify that the rules in the decision table belong to the
approval-rulesruleflow group. This can be done with a hidden attribute column with default values.In the Guided Decision Table view, click → to create a column.
In the Add a new column dialog box, check the Include advanced Options checkbox. Select Add an Attribute column. Click Next.
In the
Select an Attributedialog box, select Ruleflow-Group. Click Finish.Back in the Guided Decision Table editor, open the Columns tab, and expand the Attribute columns section.
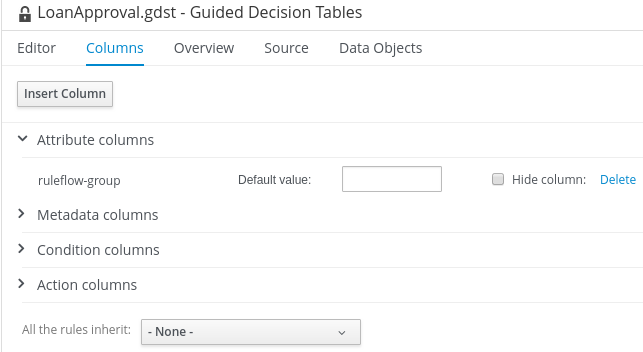
In the Default value text box, enter
approval-rules. Check the Hide column check box.NOTE
The default value is required to make sure that the
ruleflow-groupvalue sets automatically whenever a new rule row is added.Add the first rule row to the decision table.
In the Guided Decision Table view, in the Editor tab, click Insert → Append row.
Fill in the following values:
Description:
Rejected - amount too low.Min Amount: leave blank
Max amount:
1000Debt ratio: leave blank
Min Credit Score: leave blank
Max Credit Score: leave blank
Approved: make sure to deselect
Comment: Select amount too low
At this point the decision table looks like:

Add the remainder of the rows according to the following table:
Description Min Amount Max Amount Debt Ratio Min Credit Score Max Credit Score Approved Comment Rejected - amount too low 1000 No amount too low Rejected - amount too high 1000000 No amount too high Rejected - debt ratio too high 1000 1000000 > 30 No debt ratio too high Rejected - insufficient credit score 1000 <= 30 300 No insufficient credit score Approved - sufficient credit score 1000 100000 <= 30 300 Yes sufficient credit score Rejected - insufficient credit score 100000 400000 <= 30 400 No insufficient credit score Approved - sufficient credit score 100000 400000 <= 30 400 Yes sufficient credit score Rejected - insufficient credit score 400000 500000 <= 30 500 No insufficient credit score Approved - sufficient credit score 400000 500000 <= 30 500 Yes sufficient credit score Rejected - insufficient credit score 500000 1000000 <= 30 700 No insufficient credit score Approved - sufficient credit score 500000 1000000 <= 30 700 Yes sufficient credit score 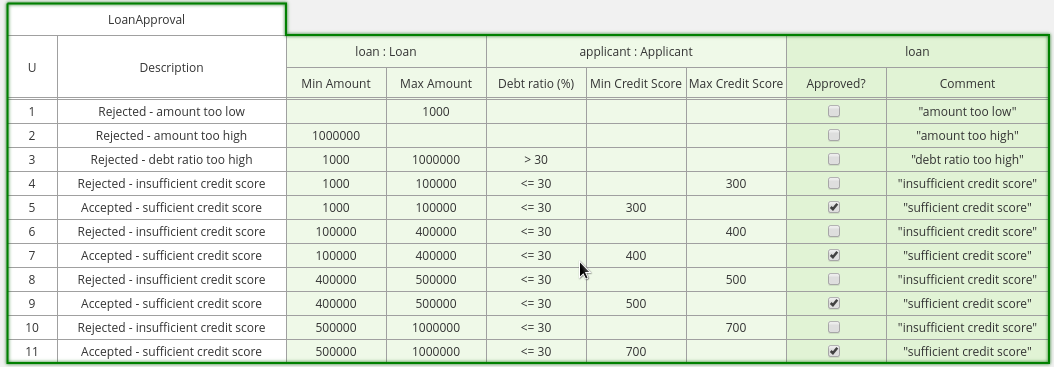
In the Guided Decision Table view, click Validate. The validation should be successful.
Evaluate the DRL rules generated from the decision table, click on the Source tab.
Optionally, you can create test scenarios for the approval rules.
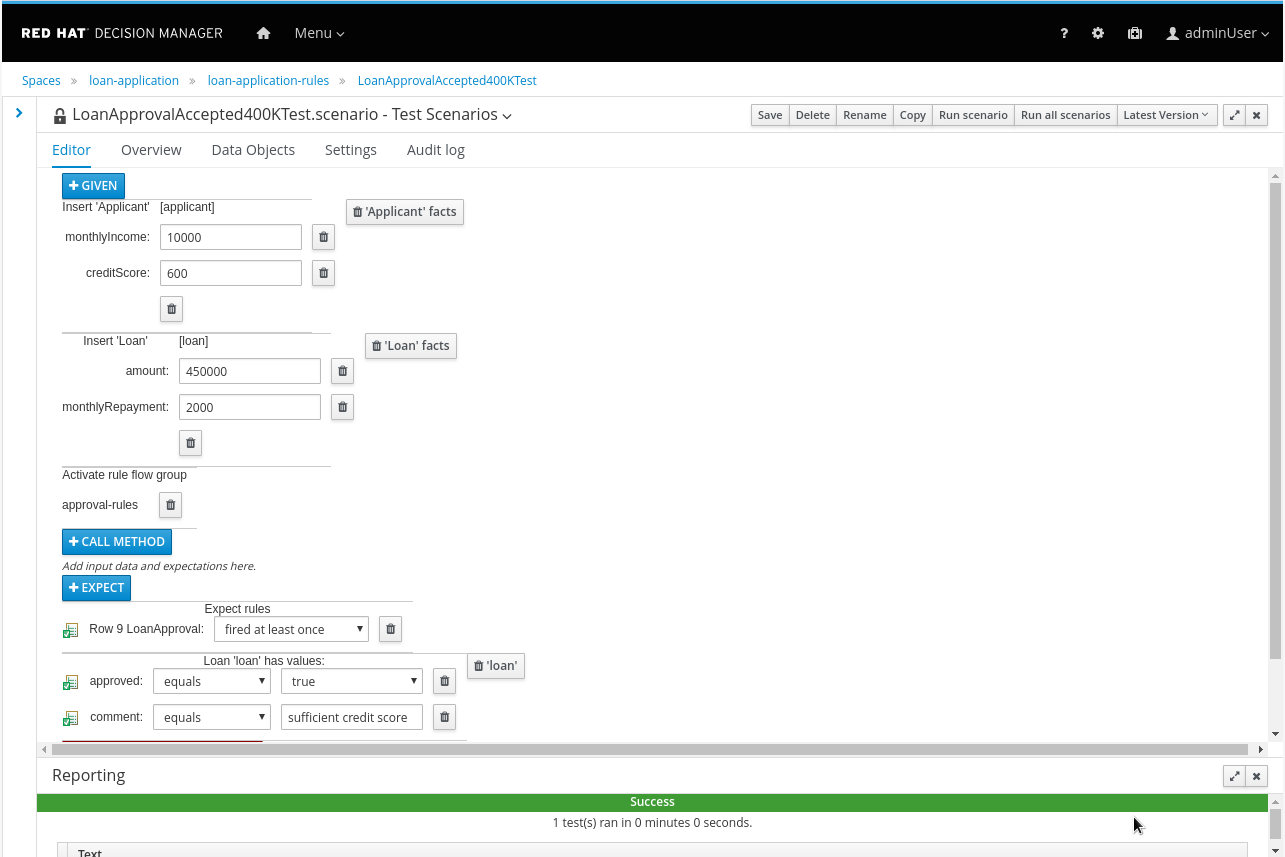
As an example, a test scenario for the Accepted - sufficient credit score for a loan with an amount between 400000 and 500000 could look like:
Build the ruleflow process that will govern rule execution as a ordered set of activities.
In Red Hat Decision Manager, you can design ruleflow processes using BPMN2. However, not all BPMN2 constructs are supported. For example, there is no support for human tasks, as this would require a persistence engine to store the state of the process while waiting for the human task to be completed. Red Hat Decision Manager only supports in-memory execution of BPMN2 processes.
Create a new business process.
In the
loan-application-rulesproject view, click and choose Business Process from the drop-down menu.In the Create new Business Process dialog box, enter
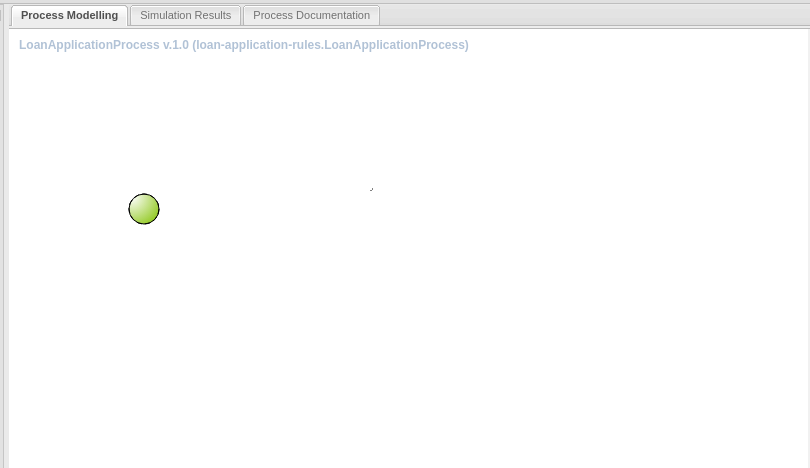
LoanApplicationProcessas the name of the business process. Select thecom.loan_application_loan_application_rulespackage. Click .The Business Process editor opens. At this moment, the process only consists of a start node (the green circle).
Configure the business process to support the data objects.
Open the property pane by clicking << icon on the top right of the canvas.
Click the Imports drop-down arrow to open the Editor for Imports dialog box.

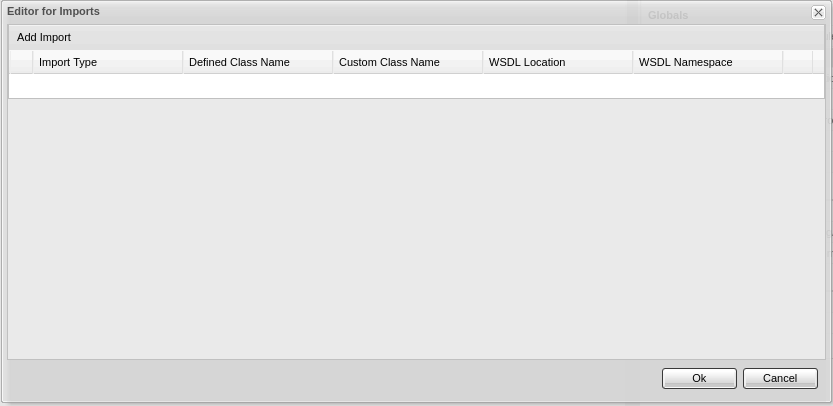
Click Add Import, select the
defaultimport type, and click on theDefined Class Namedrop-down box. Select Applicant. Click Ok.
Add a business rules node for the initialization rules.
Select the start node, click on the square box on the right, and drag a node to the canvas.
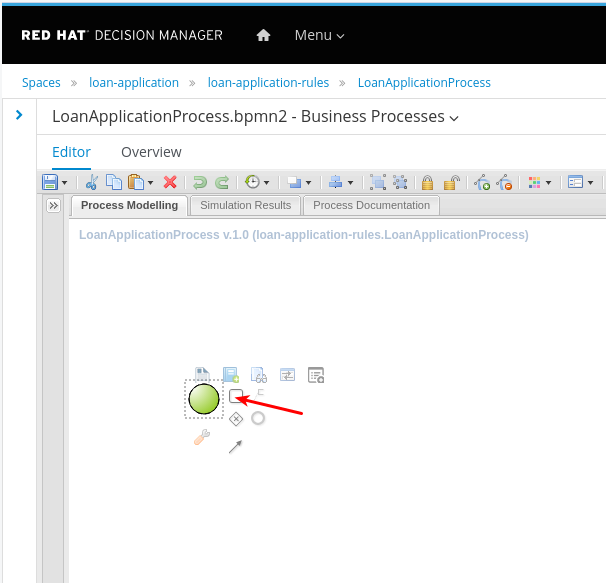
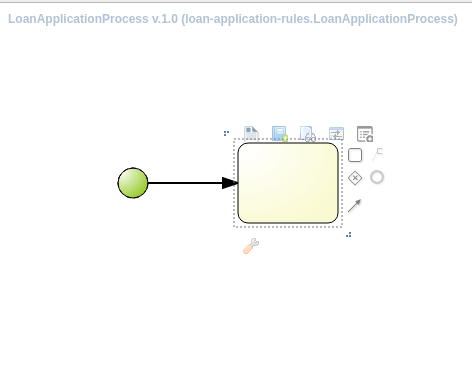
Select the new node, and hover over the tool icon at the bottom. In the pop-up box, select Business Rule Task.
Alternatively, open the Object Library pane by clicking on the >> icon on the top left of the canvas. Open the Tasks pane, and drag a Business Rule task node on the canvas. Select the start node, select the arrow icon and drag into the business rule task node to connect the start node to the business rule task node.
Select the business rule task node, and open the property pane by clicking on the << icon on the top right of the canvas.
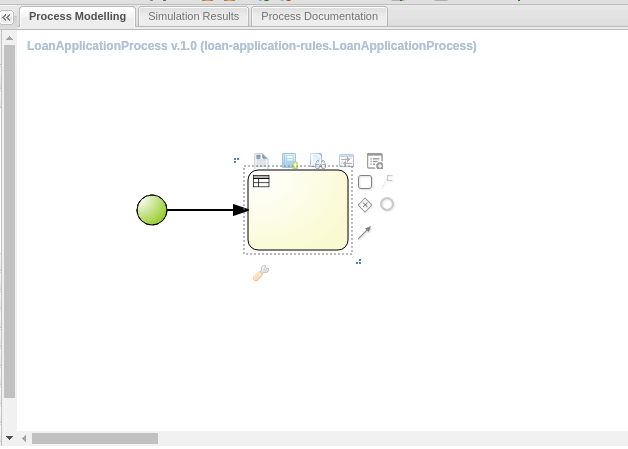
In the property pane, enter
Initialisationin theNametext field box, and click on theRuleflow Groupdrop-down arrow to open the ruleflow-group selection dialog.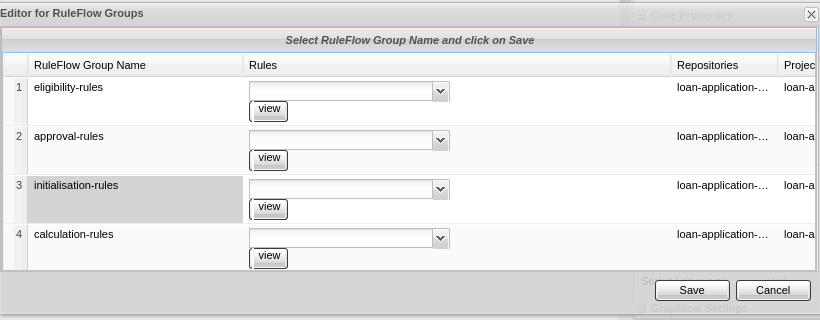
Select the
initialisation-rulesby clicking on the name of the ruleflow-group, and click Save.Add a business rules node for the eligibility rules.
Select the
Initialisationnode, click on the square box on the right, and drag a node to the canvas.Select the new node, and hover over the tool icon at the bottom. In the pop-up box, select Business Rule Task.
Select the business rule task node, and open the property pane by clicking on the << icon on the top right of the canvas.
In the property pane, enter
Eligibility Rulesin the Name text field box, and click the Ruleflow Group drop-down arrow to open the Ruleflow Group selection dialog.Select the
eligibility-rulesby clicking on the name of the Ruleflow Group, and click Save.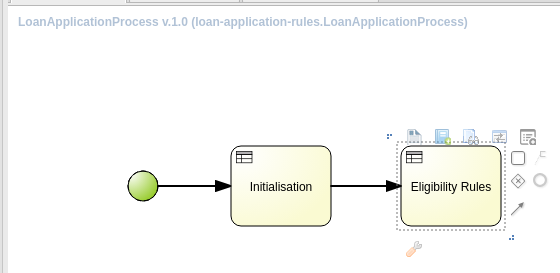
Add a gateway node. After the execution of the eligibility rules, the process can go two ways: if the applicant is not eligible, the process should stop—there is no point in continuing. If the applicant is eligible, the process should continue with the interest rate calculation and approval rules.
Select the
Eligibility Rulesnode, and click on the diamond-shaped icon on the right to drag an exclusive gateway (also called XOR gateway) to the canvas.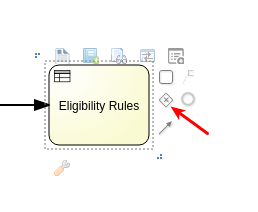
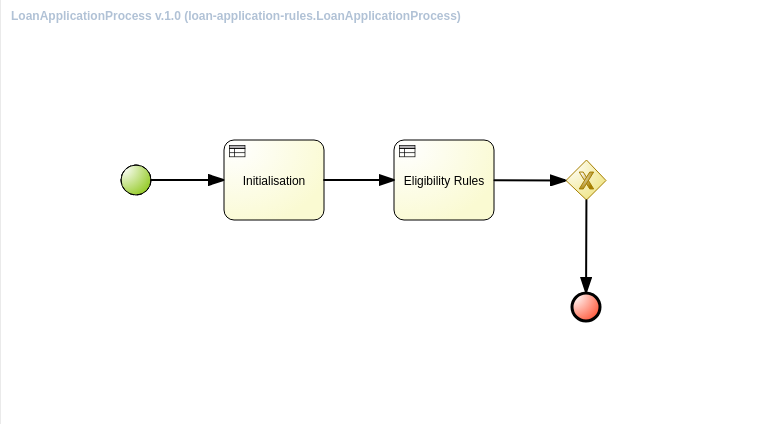
Select the gateway node, click on the circle icon on the right, and drag an end node to the canvas.

Select the arrow between the gateway node and the end node, open the property pane. Enter
noin the Name field. Click on the drop-down arrow next to Condition Expression Language, and selectdroolsfrom the drop-down list.Select the drop-down arrow next to Expression to open the Expression Editor dialog box.
In the editor, enter the following expression:
Applicant( eligible == false )
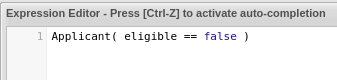
Click Ok.
Express the gateway condition with a DRL condition statement.
The DRL expression evaluates to
trueif there is anApplicantobject with field eligible set tofalsein the rules working memory. This is the case if one of the eligibility rules fired.Select the gateway node, click on the square icon to the right and drag a task node to the canvas.
Select the arrow between the gateway node and the new task node. Open the property pane, and enter
yesin the Name field.Select the gateway node, open the property pane, and click on the drop-down arrow next to the
default gatefield. Selectyesin the drop-down menu.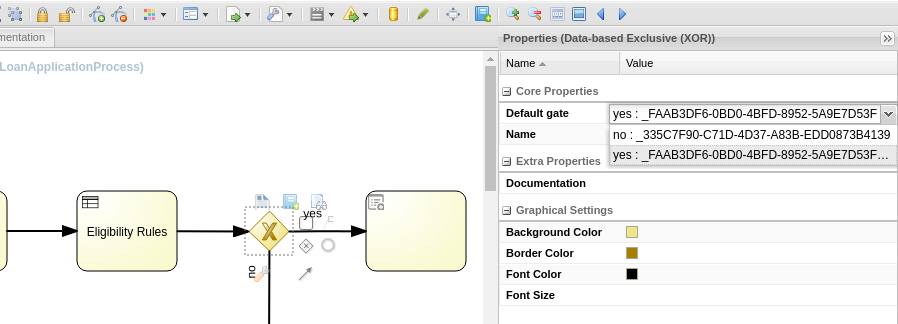
The
nobranch is evaluated first. If it evaluates tofalse, then the execution follows the default branch (yes).Add a business rules node for the interest rate calculation rules.
Select the task node to the right of the gateway node. Hover over the tool icon at the bottom. In the pop-up menu, select Business Rule Task.
In the property pane, enter
Interest Rate Calculationin the Name text field box, and click on the Ruleflow Group drop-down arrow to open the Editor for RuleFlow Groups selection dialog.Select
calculation-rulesby clicking in the ruleflow-group, and click Save.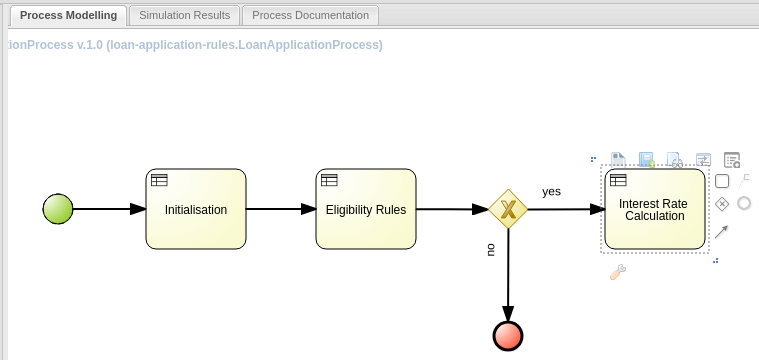
Add a business rules node for the approval rules.
Select the task node to the right of the Interest Rate Calculation node. Hover over the tool icon at the bottom. In the pop-up menu, select Business Rule Task.
Use
Approval Rulesfor the node name.Use the
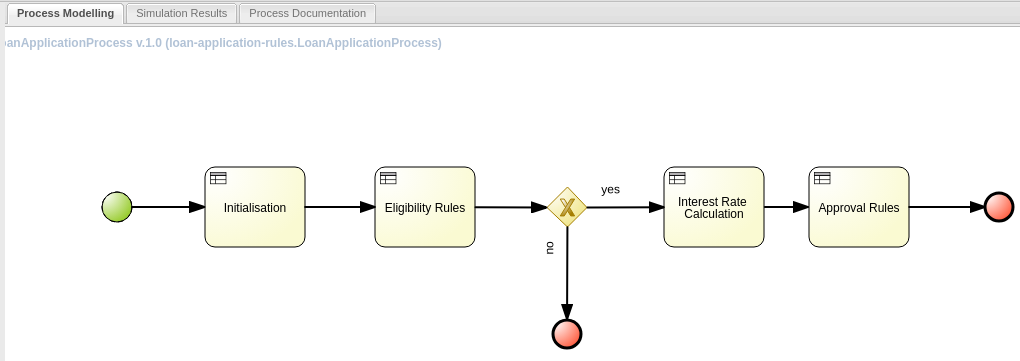
approval-rulesruleflow-group.Select the Approval Rules node, and drag an end node to the canvas. The completed business process looks like:
Click on the to save the process.
Build the loan application and deploy it to a Decision Manager Execution Server.
By now you have all the pieces to be able to deploy and test the Loan Application business rules app. Using the built-in Swagger integration, you can easily test the application.
Define the knowledge base and knowledge session, and set the project version.
In the
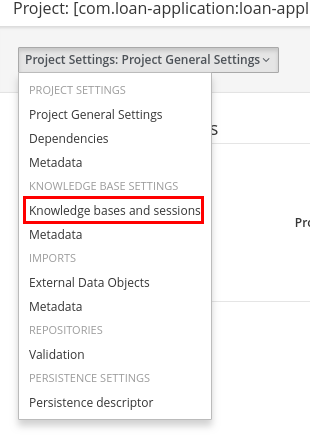
loan-application-rulesproject view, click Settings in the top right corner to open the Project Settings View.
In the Project Settings view, select Knowledge bases and sessions from the Project Settings drop-down list,
In the Knowledge Base Settings view, click Add to create a Knowledge base definition.
In the pop-up window, enter
default-kbaseas the knowledge base name.Scroll down to the Knowledge Sessions section, and click Add.
In the pop-up window, enter
default-ksessionas the knowledge session name.Check the
Defaultcheck box, and make sure the state is set toStateless.
When using a stateless session, a new session is created on the Decision Manager Execution Server for every request. This ensures that different invocations of the rule engine are completely isolated from each other. With a stateful session, different invocations would share the same session, and would be able to see and act on each other fact objects, leading to unwanted side-effects. There are valid use-cases for stateful sessions, but for most one-off calculation-type decisions a stateless session is recommended.
Click .
Click
Knowledge Base Settingson the top left of the screen, and selectProject General Settingsfrom the drop-down box.Change the version of the project from
1.0.0to1.0.0-SNAPSHOT.
Working with a snapshot version makes it a lot easier during the development phase to do iterative deployments of the project.
Click Save to save the project settings.
Build and deploy to the Decision manager Execution Server.
In the
loan-application-rulesproject view, click in the top right corner.Expect to see a green bar appearing at the top of the screen to indicate success.
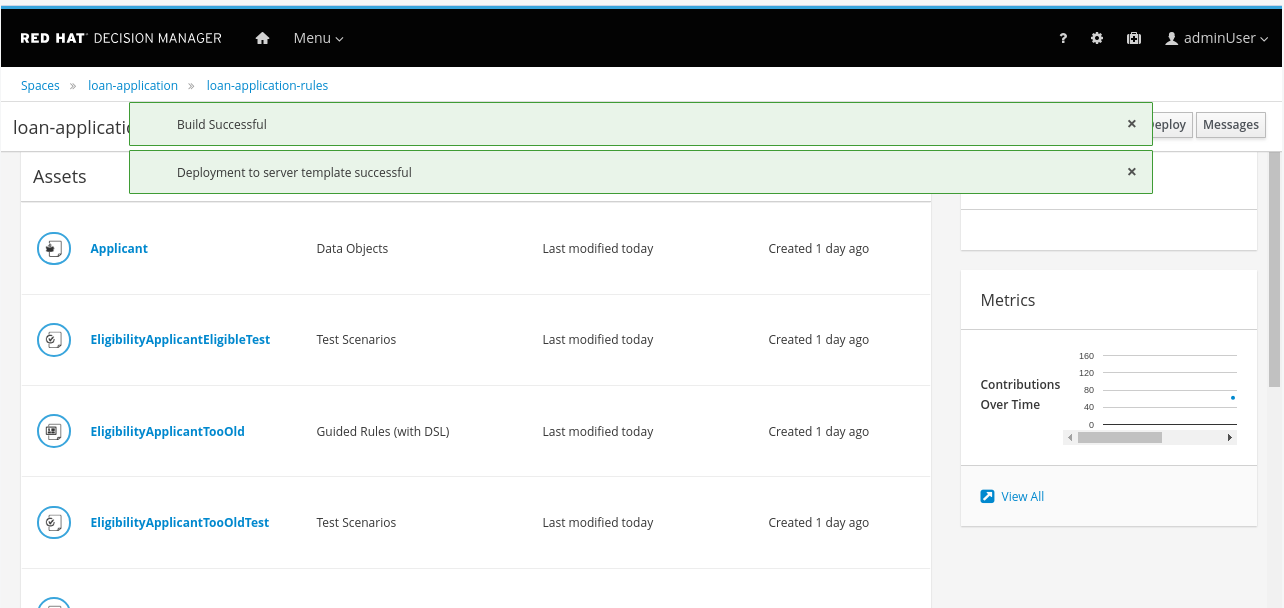
The
Build & Deployaction compiles the project assets, packages them in a archive and deploys the archive on the execution server.If the build fails, then something is wrong with one or more of the project assets. In that case, inspect the messages, and make the required adjustments.
Navigate to the Decision Central home screen, and click on the deploy icon. In the deploy screen verify that the
loan-application-rulescontainer is deployed on the execution server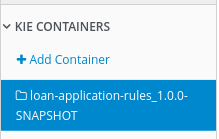
Test the application using Swagger
In another browser window or tab, navigate to the URL of the Red Hat OpenShift Container Platform. Log in into the console, and in the left panel, navigate to the → section. Copy the URL of the
secure-gpte-kieserverroute.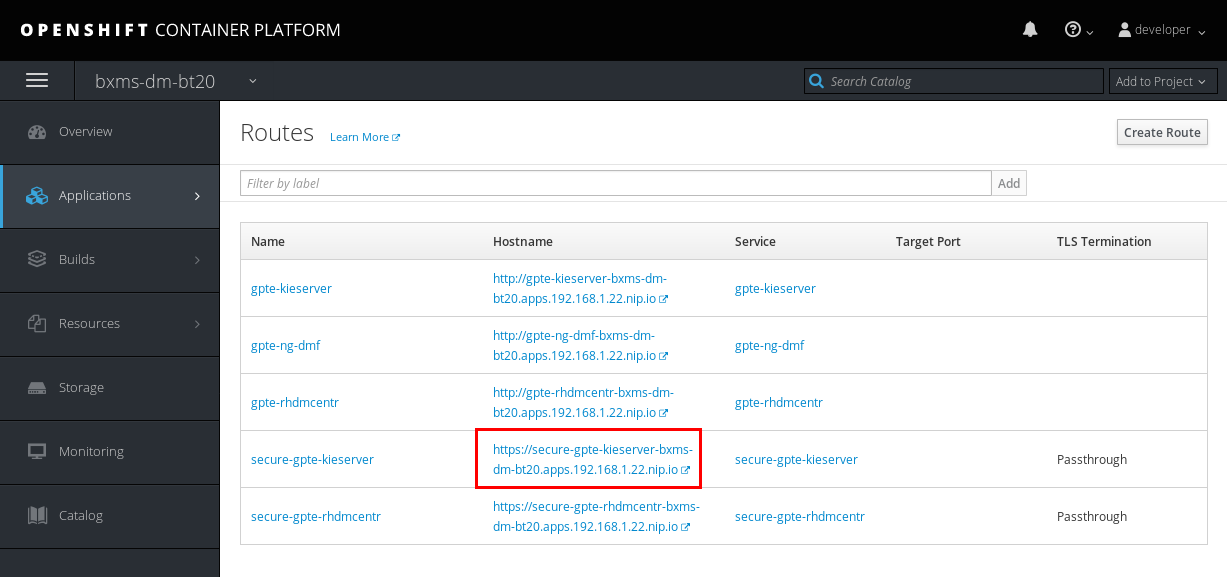
Open a new browser tab or window, paste the URL in the address bar and append the
/docspath. Expect a Swagger UI page to open.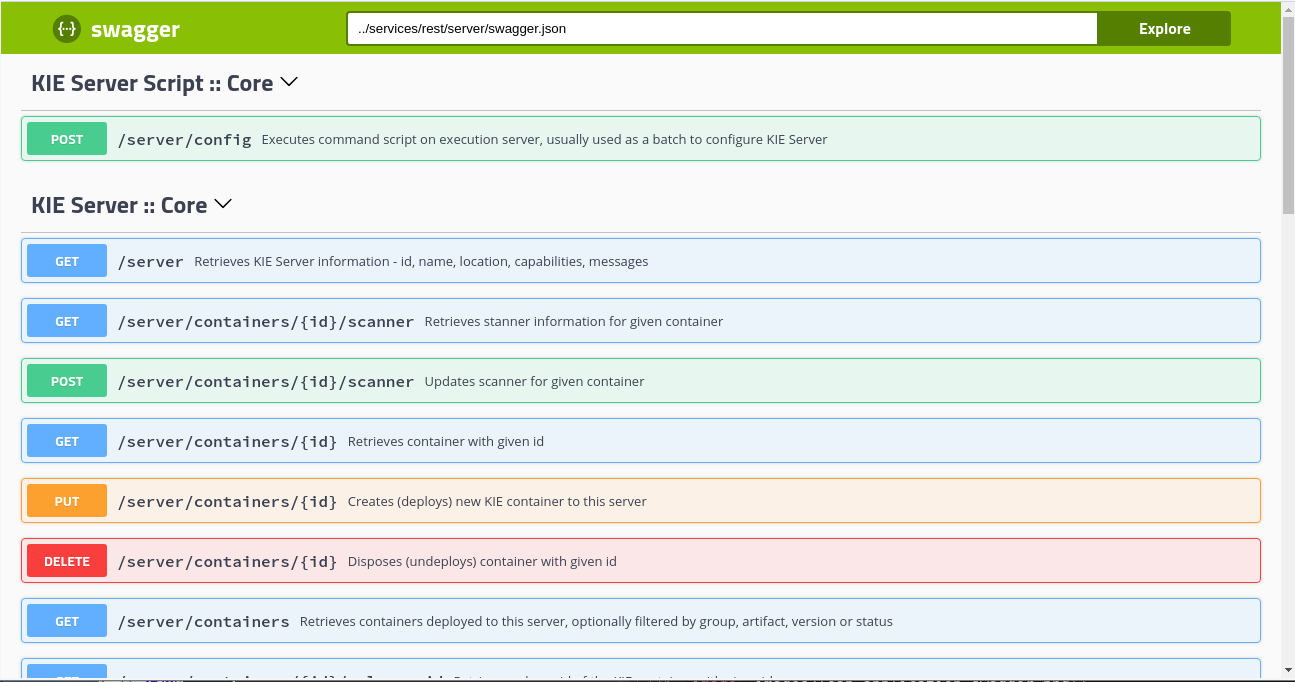
Ignore the warnings about untrusted certificates, and add security exceptions in order to access the Execution Server.
The Swagger page documents the REST API exposed by the Execution Server.
Scroll down in the Swagger UI page until you find the
Rules evaluation :: BRMsection.
Click on the
POSTlink to expand the section, and click on the left.In the
idfield, enterloan-application-rules.Under the
bodyfield, change theParameter content typetoapplication/json.Under the , change the
Response content typetoapplication/json.NOTE
The following JSON file may be downloaded from
http://materials.example.com/labs/loan.json.Paste the following contents in the
bodyfield:{ "lookup": "default-ksession", "commands": [ { "insert": { "object": { "com.loan_application.loan_application_rules.Applicant": { "creditScore":410, "name":"Lucien Bramard", "age":40, "yearlyIncome":90000 } }, "out-identifier":"applicant" } }, { "insert": { "object": { "com.loan_application.loan_application_rules.Loan": { "amount":250000, "duration":10 } }, "out-identifier":"loan" } }, { "start-process" : { "processId" : "loan-application-rules.LoanApplicationProcess", "parameter" : [ ], "out-identifier" : null } } ] }The
lookupdirective specifies the name of the session to use. This corresponds to the name of the stateless session declared in the project.The
commanddirective describes the commands to execute on the Execution Server. In this case two objects are inserted in the working memory of the session, one of typeApplicantand another of typeLoan. Finally an instance of the ruleflow process is started, which in turn triggers activation and firing of the rules.The
out-identifierdirective is used to indicate that the object should be part of the response. The state of the Applicant and Loan object is changed as result of rule execution, so to be able to inspect the result of the rules they need to be part of the result payload.Click the Execute bar to post the request to the execution server.
The first time you do so, an authentication pop-up appears. The REST API of the execution server is protected with basic authentication. In the pop-up enter the credentials you use for Decision Central (
adminUser/test1234!).Expect to see the following response in the Server response section:
{
  "type" : "SUCCESS",
  "msg" : "Container loan-application-rules successfully called.",
  "result" : {
    "execution-results" : {
      "results" : [ {
        "value" : {"com.loan_application.loan_application_rules.Loan":{
  "amount" : 250000,
  "approved" : true,
  "comment" : "sufficient credit score",
  "duration" : 10,
  "interestRate" : 0.72,
  "monthlyRepayment" : 2098.3333333333335
}},
        "key" : "loan"
      }, {
        "value" : {"com.loan_application.loan_application_rules.Applicant":{
  "name" : "Lucien Bramard",
  "age" : 40,
  "creditScore" : 410,
  "eligible" : true,
  "monthlyIncome" : 7500.0,
  "yearlyIncome" : 90000
}},
        "key" : "applicant"
      } ],
      "facts" : [ {
        "value" : {"org.drools.core.common.DefaultFactHandle":{
  "external-form" : "0:2:1424229236:1424229236:2:DEFAULT:NON_TRAIT:com.loan_application.loan_application_rules.Loan"
}},
        "key" : "loan"
      }, {
        "value" : {"org.drools.core.common.DefaultFactHandle":{
  "external-form" : "0:1:268014846:268014846:1:DEFAULT:NON_TRAIT:com.loan_application.loan_application_rules.Applicant"
}},
        "key" : "applicant"
      } ]
    }
  }
}
Note that the
approvedfield of the Loan object is set totrue, and thecommentis set tosufficient credit score. The calculated interest rate is0.72, and the monthly repayment amounts to2098.3333333333335.Feel free to change some of the values in the request JSON (loan amount, duration, age, yearly income, credit score) and verify how the outcomes changes when the input parameters change.
This concludes this guided exercise.
Extra: Implement the Interest Rate Calculation rules as Guided Decision Table
In the
loan-application-rulesproject view, click on the and choose Guided Decision Table from the drop-down menu.In the Create new Guided Decision Table dialog box, enter
InterestRateCalculationas the Guided Decision Table name. Select thecom.loan_application.loan_application_rulespackage. Deselect Wizard. Leave the Hit Policy to None. For Table Format, choose Extended. Click .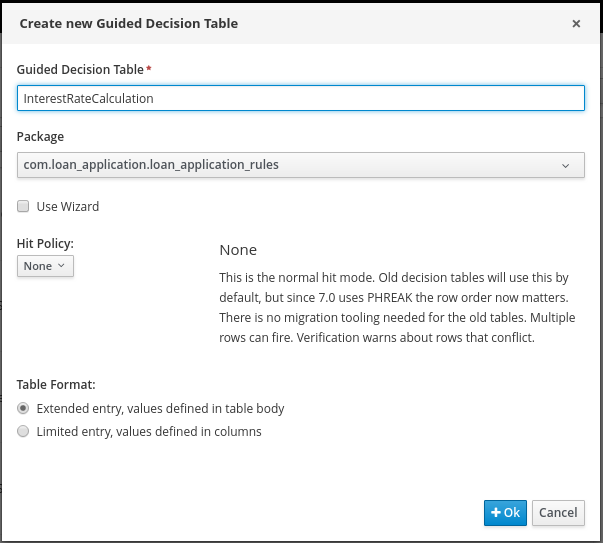
The first condition column defines the minimum value of the loan amount range.
In the Guided Decision Table view, click on → to insert a new column.
In the Add a new column dialog box, select Add a condition. Click .
In the next dialog, click . Select
Loanas Fact type andloanas binding. Leave theNegatecheck box unchecked. Click .Back in the main dialog box, click .
Select
Literal Valuefor the calculation type. ClickYou do not need a binding for the amount field, so click .
Choose
greater thenas operator. Click .You don’t need a value list or default values for this column, so click .
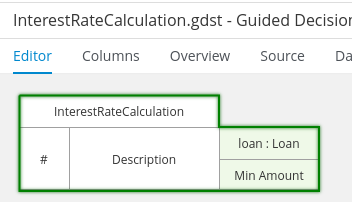
Set the header description to
Min Amount. Leave the Hide column unchecked. Click Finish.At this point the decision table looks like:
Add a column for the maximum value of the loan amount range. Select the existing
Loan[loan]fact pattern, and useless than or equal toas operator for theamountfield. Set the header toMax Amount.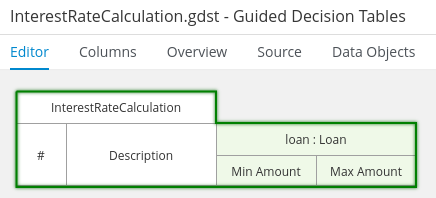
Add a column for the duration of the loan. Select the existing
Loan[loan]fact pattern, and useequal toas operator for thedurationfield. Set the header toDuration.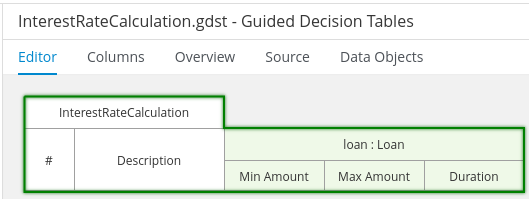
Add an action column to set the
interestRatefield on the Loan object and calculate the monthly repayment rate:In the Guided Decision Table view, click on → to insert a new column.
In the Add a new column dialog box, check the Include advanced optionscheck box. Select Add an action BRL fragment. Click .
In the next dialog, click on the green + icon. In the Add new Action dialog box, select
Change field value of loan. Click on the pencil icon next to Loan[loan]. In the Add a field dialog box, selectinterestRate. Click the pencil icon next tointerestRate. Select Template key.Click the green + icon next to
THENto add another fragment. In the Add new Action dialog box, selectChange field value of loan. Click on the pencil icon next toLoan[loan]. In theAdd a fielddialog box, selectmonthlyRepayment. Click on the pencil icon next tomonthlyRepayment. SelectFormula. In the formula text box, paste the following contents:((loan.getInterestRate()*loan.getAmount()/100)+loan.getAmount())/(loan.getDuration()*12))
Click on the green + icon next to
THENto add another fragment. In the Add new Action dialog box, selectAdd Free Form DRL. In the DRL text box, add the following contents:System.out.println("Rule fired : [" + drools.getRule().getName()+"]");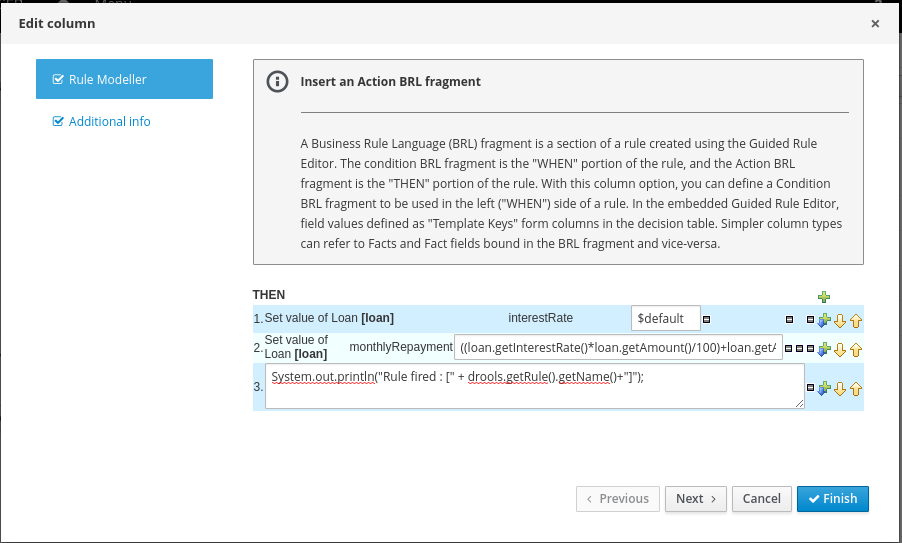
Click . In the next dialog, set the Header description to
Interest Rate. Leave Hide column unchecked. Click .
Finally, specify that the rules in the decision table belong to the
calculation-rulesruleflow-group. This can be done with a hidden attribute column with default values.In the Guided Decision Table view, click → to insert a new column.
In the Add a new column dialog box, check the Advanced Options checkbox. Select Add an Attribute column. Click .
In the Select an Attribute dialog box, select Ruleflow-Group. Click .
Back in the Guided Decision Table editor, open the
Columnstab, and expand the Attribute columns sectionIn the Default value text box, enter
calculation-rules. Check the Hide column check box.The default value is required to make sure that the
ruleflow-groupvalue is set automatically whenever a new rule row is added.
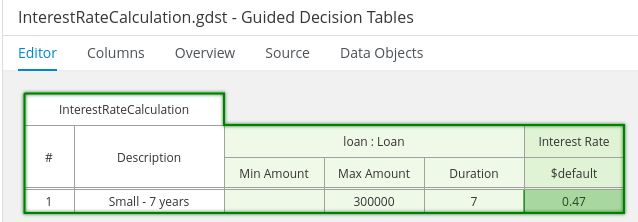
Add the first rule row to the decision table.
In the Guided Decision Table view, click on → to append a row to the table.
Fill in the following values:
Description:
Small - 7 years.Min Amount: leave blank
Max amount:
300000Duration:
7Interest rate:
0.47
At this point the decision table looks like:
Add the remainder of the rows according to the following table:
Name Min Amount Max Amount Duration Interest Rate Small - 7 years 300000 7 0.47 Large - 7 years 300000 600000 7 0.70 Very Large - 7 years 600000 7 0.98 Small - 10 years 300000 10 0.72 Large - 10 years 300000 600000 10 0.90 Very Large - 10 years 600000 10 1.10 Small - 12 years 300000 12 0.87 Large - 12 years 300000 600000 12 1.06 Very Large - 12 years 600000 12 1.31 Small - 15 years 300000 15 1.06 Large - 15 years 300000 600000 15 1.20 Very Large - 15 years 600000 15 1.45 Small - 20 years 300000 20 1.25 Large - 20 years 300000 600000 20 1.39 Very Large - 20 years 600000 20 1.65 Small - 25 years 300000 25 1.45 Large - 25 years 300000 600000 25 1.65 Very Large - 25 years 600000 25 1.85 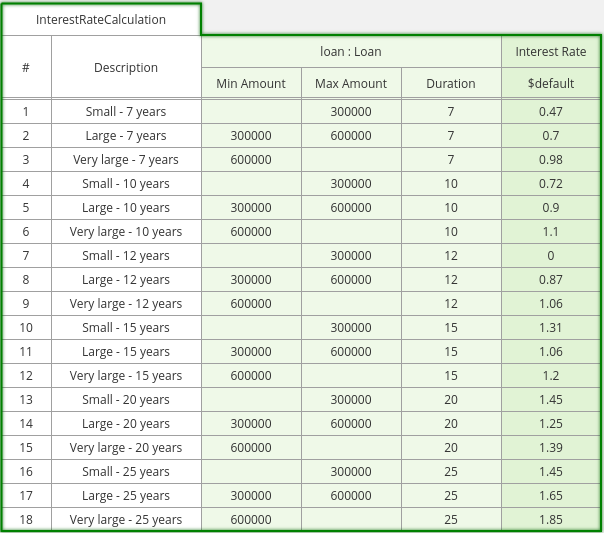
In the Guided Decision Table view, click Validate to validate the decision table. The validation should be successful.
To see the DRL rules generated from the decision table, click on the Source tab.
Optionally, you can create test scenarios for the calculation rules.
As an example, a test scenario for the
Small - 7 yearsrule could look like: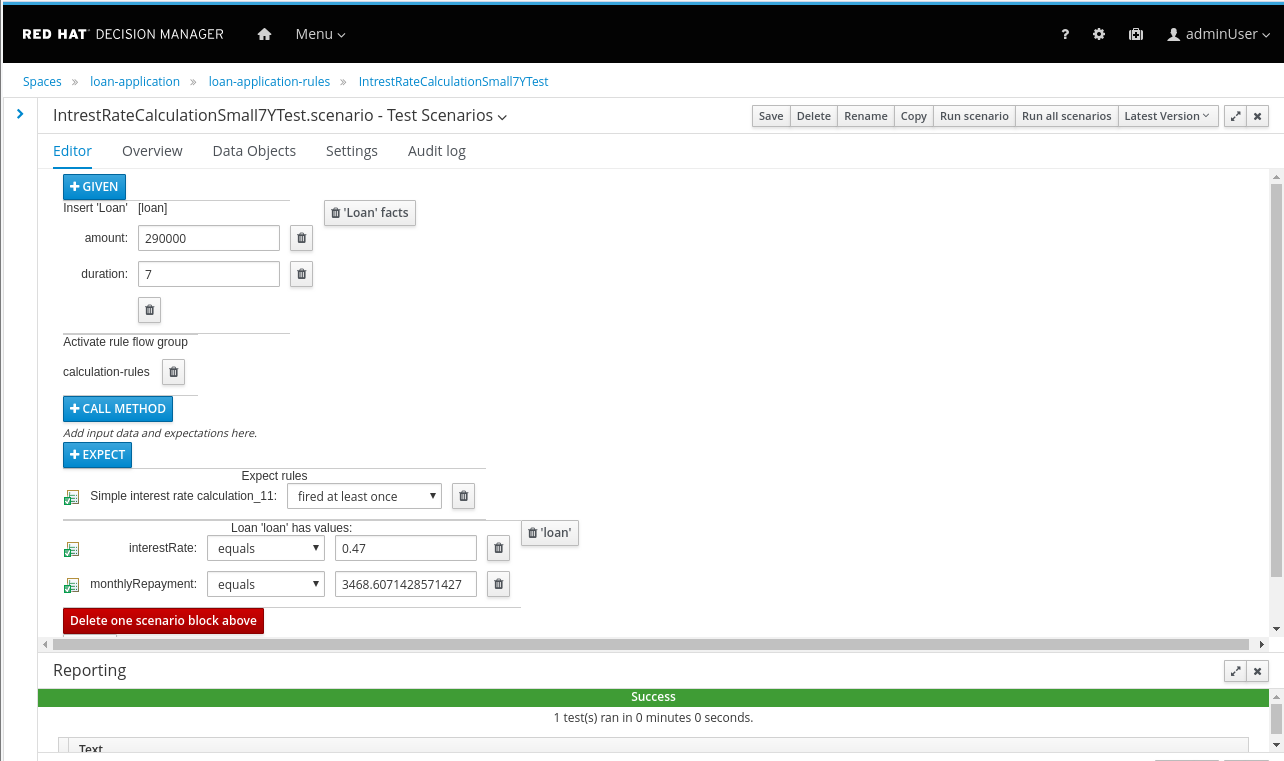
This concludes the guided exercise.